
Walking straight from your front door into your living room can feel jarring—for both you and your guests. Without that transitional buffer zone, shoes pile up, keys get lost, and your home never quite feels organized. But here's the good news: you don't need actual architecture to create a welcoming entrance. With a few clever styling tricks, you can craft a curated entryway illusion that functions beautifully and sets the perfect tone for your home.
TL;DR: The Entryway Illusion Formula
- Define your "entry zone" with a rug, directional lighting, and one vertical anchor piece
- Create a "landing strip" surface (slim console, floating shelf, or hook rail) for everyday essentials
- Choose either a mirror OR one statement artwork as your focal point (not both unless your wall is wide)
- Follow the 2/3 rule for wall art: select pieces that are approximately two-thirds the width of furniture beneath them for proper proportion (learn more about the 2/3 rule here)
- For renters: use removable hooks, adhesive strips, or leaning art to avoid wall damage
- Add warm, directional lighting to create ambiance and visual separation
- Include a small tray or bowl for keys, sunglasses and everyday items
- Keep the space clutter-free with hidden storage solutions
- Create an "arrival ritual" that helps maintain organization
Why a Home Without an Entryway Feels "Messy" (and how to fix it)
When you enter a space without a defined transition area, your brain doesn't get that crucial moment to shift gears between "outside world" and "home sanctuary." This creates a jarring psychological effect that can make even a tidy space feel disorganized. Interior designers call this the "visual transition" problem—and it's especially common in Australian apartments and open-plan homes.

The common challenge: a front door that opens directly into your living space creates visual confusion
Common Symptoms of No-Entryway Homes (And Quick Fixes)
Symptom: Clutter Magnet
Without a designated drop zone, keys, mail, and shoes scatter everywhere, creating instant visual chaos.
Quick Fix: Add a small console table with drawers or baskets to contain everyday items in one defined area.
Symptom: Awkward Furniture Layout
When your front door opens directly into your living space, furniture placement becomes challenging and often creates an awkward flow.
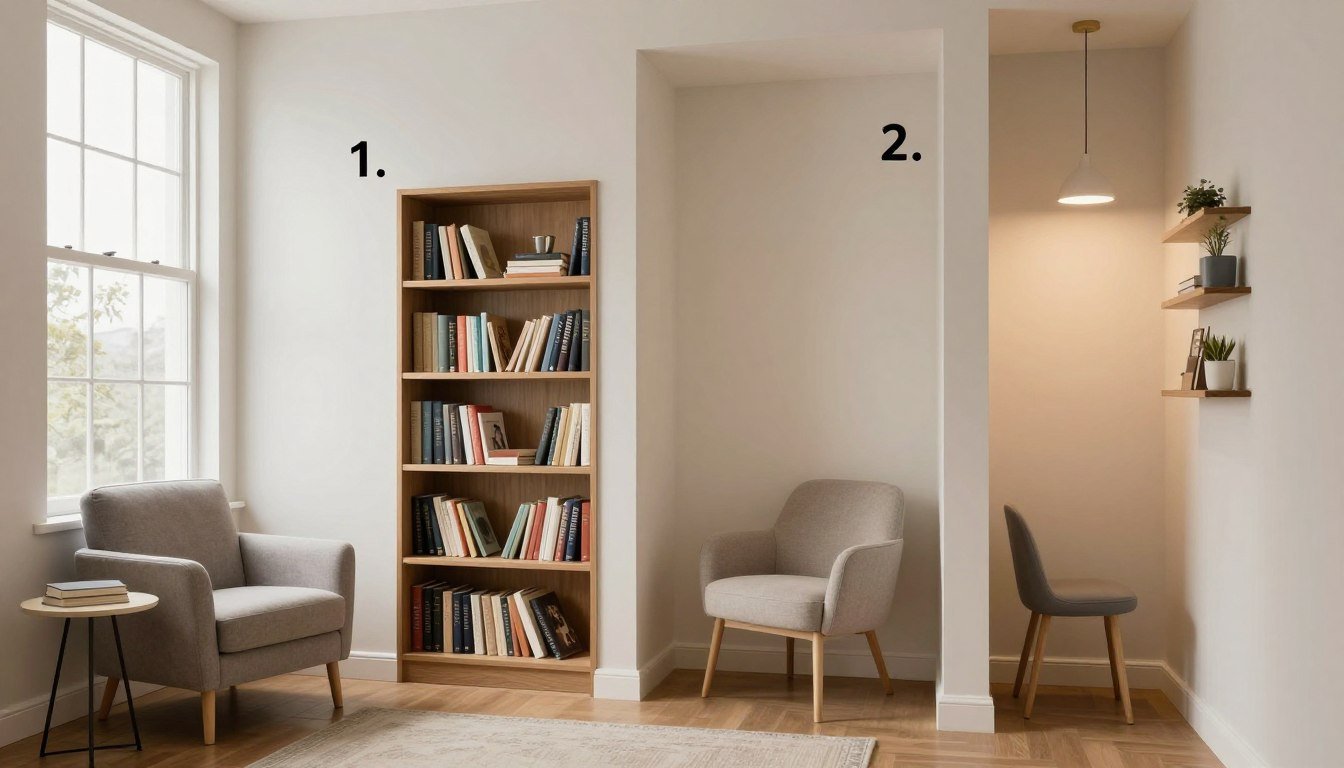
Quick Fix: Position a sofa or bookcase with its back to the door to create a natural divider that defines separate zones.
Symptom: Lack of Privacy
Opening your door means visitors immediately see your entire living space, with no buffer for privacy.
Quick Fix: Use a decorative screen, tall plant, or strategic artwork placement to create visual separation without building walls.
Symptom: No Transition Moment
Without that pause point between outside and in, your home lacks the psychological "decompression zone" that helps you shift mindsets.
Quick Fix: Create a distinct flooring change with a rug or runner to signal to your brain that you've entered a new zone.
The Entryway Illusion Formula (the 5-part blueprint)
1) Define the boundary (without building walls)
The first step in creating your faux entryway is establishing a clear visual boundary. This doesn't require construction—just clever use of existing elements.

- Rug zoning: Place a dedicated entryway rug (80-100cm/32-40in diameter for round rugs or 75x120cm/30x48in for rectangular ones) to instantly define where your "entryway" begins and ends. Choose durable materials like wool or synthetic blends that can handle foot traffic.
- Runner direction: In narrow spaces, use a runner perpendicular to the door to create depth and draw the eye inward. For wider spaces, place it parallel to create width separation.
- Ceiling/wall paint trick: For a more permanent solution, consider painting the ceiling or wall in your entry zone a slightly different shade than the rest of your living space. Even a subtle colour shift creates a psychological boundary on Australian plasterboard walls.
2) Add a landing strip (surface or storage)
Every functional entryway needs a dedicated spot for everyday essentials. This "landing strip" becomes the practical heart of your entryway illusion.

- Console table: A slim console (25-35cm/10-14in deep) provides a surface without eating into precious floor space. Look for options with drawers or shelves for added storage.
- Slim shelf: In extremely tight spaces, a floating shelf (15-20cm/6-8in deep) mounted at 90-95cm/35-37in height creates a minimal landing zone that doesn't project into the room.
- Wall hooks + tray: Mount hooks at 160-170cm/63-67in height with a small wall-mounted tray beneath for a vertical solution that takes zero floor space.
- Basket for shoes: A dedicated basket or bin keeps footwear contained and prevents the "shoe explosion" effect when you open the door.
3) Add one vertical anchor (mirror OR art)
Your entryway needs one strong vertical element that draws the eye and establishes presence. This is where you choose between the practicality of a mirror or the personality of artwork.
When a mirror works best:
- In smaller, darker spaces that need light reflection
- When you want to create the illusion of more space
- For practical last-minute appearance checks
- In narrow hallways where depth is needed
When art works best:
- To inject immediate personality and warmth
- When you want to set a specific mood or colour palette
- In spaces that already have good natural light
- To create a focal point that isn't reflective

4) Lighting that makes it feel intentional
Lighting is the secret ingredient that transforms a collection of furniture into a deliberate, designed space. The right lighting creates ambiance and helps define your entryway zone.
- Warm bulb temperature: Choose bulbs in the 2700-3000K range for a welcoming, inviting glow that feels intentionally separate from overhead lighting.
- Wall sconce: If you can hardwire, wall sconces at 150-170cm/59-67in height create directional light that defines the space without taking up surface area.
- Table lamp: A small lamp (under 40cm/16in tall) on your console adds ambient lighting and a decorative element.
- Renter-friendly options: Battery-operated puck lights, plug-in wall sconces, or clip lamps provide lighting solutions without electrical work on plasterboard or brick walls.
5) The "arrival ritual" styling (keys, bag, scent)
The final element of your entryway illusion is creating a consistent arrival ritual that reinforces the space's purpose and keeps it organized.
- Position a small decorative tray or bowl for keys, sunglasses, and wallet
- Add a hook or designated spot for your everyday bag
- Include a small diffuser or candle for a signature scent that signals "home"
- Create a habit of placing items in their designated spots immediately upon entering
- Do a quick reset each morning or evening to maintain the space
| Layout Problem | Best Boundary Trick | Best Landing Strip | Best Vertical Anchor | Best Storage Add-on | Biggest Mistake to Avoid |
| Front door opens into living room | Round rug (80-100cm/32-40in) creating visual island | Slim console with drawers | Statement art piece (creates immediate personality) | Baskets under console | Placing furniture too close to door swing area |
| Long narrow hallway | Runner perpendicular to door | Wall-mounted shelf with hooks below | Tall mirror (creates depth) | Narrow shoe cabinet | Cluttering both sides of narrow space |
| Corner door entry | L-shaped rug configuration | Corner console or floating corner shelf | Art on one wall, mirror on adjacent wall | Vertical corner shelving unit | Ignoring the corner angle (work with it, not against it) |
| Open-plan apartment | Furniture placement (sofa back to door) | Freestanding console as room divider | Hanging pendant light | Double-sided bookcase as room divider | Creating a barrier that blocks natural light flow |
5-Minute Entry Reset Checklist
- Clear console surface of any accumulated items
- Return keys and everyday items to designated tray
- Place shoes in basket or designated area
- Quick wipe of mirror or dust frame of artwork
- Reset lighting (turn on lamp if evening, adjust as needed)
- Hang coats or bags on proper hooks
- Remove any mail or papers to proper sorting area
Wall Art Rules That Make an Entryway Look Expensive

The 2/3 rule (simple explanation + example)
The secret to professional-looking art placement is proportion. The 2/3 rule states that wall art should be approximately two-thirds the width of the furniture beneath it. This creates visual balance and harmony that instantly elevates your entryway's appearance.
For example, if your console table is 120cm (47in) wide, your ideal artwork width would be around 80cm (31in). This proportion creates a pleasing relationship between the horizontal and vertical elements. Learn more about applying the 2/3 rule in different spaces.
Height rules (quick, practical)
Proper height placement is just as important as width. In entryways, where first impressions matter, getting this right creates an immediate sense of intentional design.
- Centre your artwork at eye level, typically 150-160cm (59-63in) from the floor to the centre of the piece
- When hanging art above furniture, position it 15-20cm (6-8in) above the furniture surface
- For multiple pieces, treat the grouping as one unit and centre the entire arrangement at eye level
- On Australian plasterboard walls, use appropriate anchors for heavier pieces or consider lightweight canvas prints
If the wall is narrow: go vertical
Many entryways, especially in Australian apartments, feature narrow wall spaces. When working with limited width, embrace vertical thinking.

Choose "tall and calm" artwork that draws the eye upward and creates a sense of height. Vertical pieces with simple, uncluttered compositions work best—avoid busy patterns that can make narrow spaces feel chaotic. A single striking vertical canvas creates more impact than multiple small pieces in tight spaces.
For textured walls or when you need guidance on larger statement pieces, explore our guide to large textured wall art sizing and placement.
Renter-Friendly Entryway (No holes, no stress)

Creating an entryway illusion shouldn't mean sacrificing your rental bond. These renter-friendly solutions work beautifully on Australian plasterboard and occasional masonry walls without leaving damage behind.
- Removable hooks: Command hooks and similar products can hold up to 3.5kg (7.5lbs) and remove cleanly from most surfaces
- Leaning art: Large canvas prints can simply lean against the wall on a console for instant impact without holes
- Adhesive picture strips: Special adhesive strips designed for hanging artwork can support lightweight canvas prints
- Tension rods: Create a divider using ceiling-to-floor tension rods with fabric panels or hanging plants
- Freestanding furniture: Choose pieces that don't require wall mounting, like console tables with their own storage
- Washi tape frames: Create the illusion of framed art using removable washi tape to outline "frames" around printed artwork
- Easels: Small tabletop easels can display artwork on console surfaces without wall hanging
For more comprehensive strategies on decorating rental spaces without damage, visit our complete guide to rental-friendly decorating.
Entryway Styling by Mood (3 mini looks)
Minimal + Calm Welcome

Create a serene first impression with a restrained palette of whites, creams, and natural wood tones. Choose a slim console with clean lines and minimal ornamentation. Add a single statement piece—either a round mirror or a soft, abstract canvas in neutral tones.
Complete the look with one or two carefully chosen accessories: a simple ceramic vessel, a small tray for keys, or a single architectural object. The key is restraint—each element should feel intentional and necessary.
Bold Statement First Impression

Make an immediate impact with a high-contrast approach. Choose one dominant element—typically a large-scale canvas print with bold colours or graphic patterns—and let it command attention. Pair with a console in a contrasting finish (light art with dark furniture or vice versa).
Keep accessories minimal but impactful: one sculptural object, a distinctive bowl for keys, or a unique lamp. This approach works particularly well in contemporary Australian homes with clean architectural lines.
Gallery-Wall Hallway Entry

Transform a narrow hallway into an art moment with a curated gallery wall. Select 5-7 pieces with a cohesive theme—whether black and white photography, botanical prints, or abstract pieces in complementary colours.
Maintain consistent spacing (5-8cm/2-3in) between frames and use similar framing styles for a polished look. This approach adds personality and creates a focal point that draws visitors through the space. Learn how to create the perfect gallery wall arrangement.
Rossetti Art Picks for Entryway Spaces
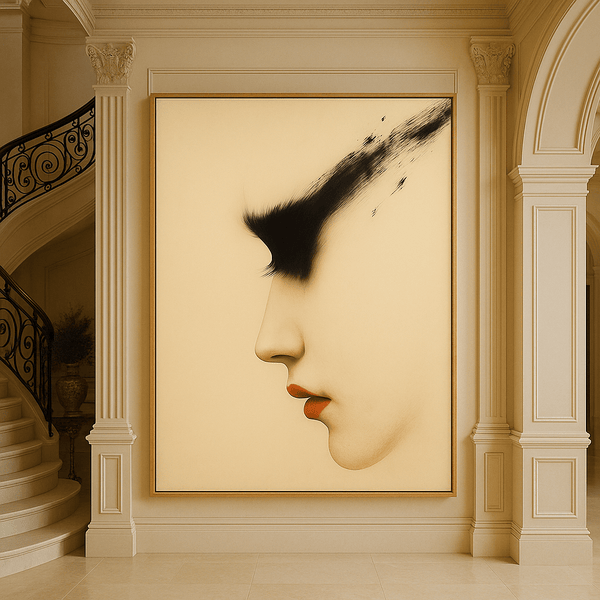
Above a slim console: Minimalist Portrait
The soft lines and elegant simplicity of the Whispered Profile canvas print create a sophisticated focal point above a slim entryway console. The neutral palette works with virtually any interior style, while the portrait format adds a human element that makes guests feel immediately welcome.
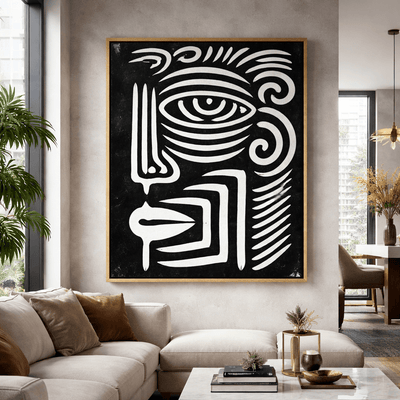
Narrow wall: Black & White Collection

For narrow entryway walls, the high-contrast appeal of pieces from our Black & White Canvas Collection creates maximum impact with minimal visual noise. These versatile pieces work in both contemporary and traditional Australian homes, adding sophisticated drama without overwhelming small spaces.
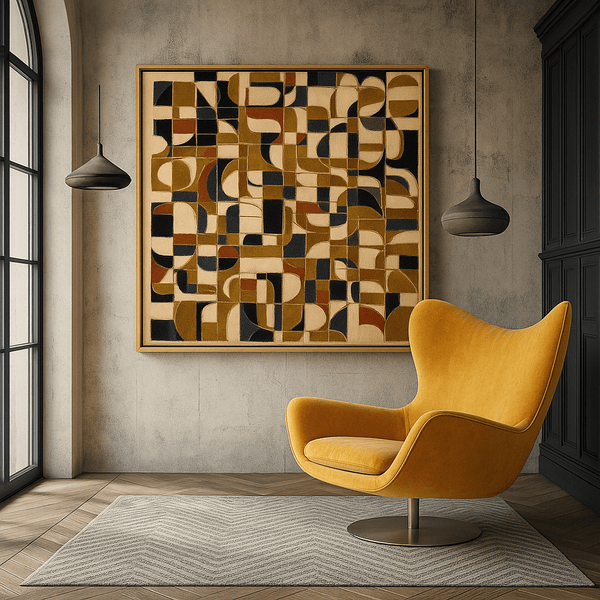
Modern geometric entry: Abstract Balance
Create a contemporary first impression with the clean lines and balanced composition of Nocturnal Balance or Whirling Patterns. These geometric pieces add architectural interest to simple entryways and establish a modern aesthetic from the moment guests enter your home.
Warm retro hallway vibe: Mid-Century Inspiration
Infuse your entryway with nostalgic warmth through the Retro Geometric Gridlock canvas print. Its mid-century modern influence pairs beautifully with warm wood tones and vintage-inspired furniture, creating an immediately inviting atmosphere that feels both timeless and on-trend.
Find Your Perfect Entryway Art
Discover pieces that transform your entrance from ordinary to extraordinary, creating a welcoming first impression for you and your guests.
Frequently Asked Questions
How do you create an entryway when you don't have one?
Create an entryway illusion by defining a boundary with a rug, adding a landing strip (console table or shelf), incorporating a vertical anchor (mirror or artwork), using strategic lighting, and establishing an arrival ritual with dedicated spots for everyday items. These elements work together to create the feeling of an entryway even in open-plan spaces.
What should be in an entryway "landing strip"?
An effective entryway landing strip should include: a surface for placing items (console, shelf, or small table), a designated spot for keys and small essentials (decorative bowl or tray), hooks or a basket for bags, storage for shoes, and ideally, a mirror or artwork to anchor the space visually. For Australian homes, consider adding a spot for umbrellas during rainy seasons.
Mirror vs art in an entryway—what's better?
Neither is universally "better"—the choice depends on your specific needs. Mirrors are ideal for smaller, darker entryways as they reflect light and create the illusion of more space, plus offer practical functionality for last-minute appearance checks. Artwork is better for injecting immediate personality, establishing a colour palette, and creating a specific mood or impression. Consider your primary goal for the space when deciding.
What size artwork works above a console table?
Follow the 2/3 rule: your artwork should be approximately two-thirds the width of your console table for proper proportion. For a 120cm (47in) console, choose artwork around 80cm (31in) wide. Height-wise, the centre of the artwork should be at eye level, typically 150-160cm (59-63in) from the floor, with 15-20cm (6-8in) of space between the top of the console and the bottom of the artwork.
How do renters create an entryway without drilling?
Renters can create damage-free entryways using removable adhesive hooks (for lightweight items), leaning larger artwork against the wall on a console table, using freestanding furniture pieces that don't require mounting, employing tension rods for fabric dividers, and utilizing adhesive picture hanging strips designed specifically for artwork. These solutions work well on both plasterboard and masonry walls common in Australian rental properties.
How do I keep an entry area tidy in a small apartment?
Maintain a tidy entry in a small apartment by implementing a "one in, one out" policy for items like shoes and bags, creating an arrival ritual where you immediately place items in their designated spots, incorporating hidden storage (baskets, drawers, or multi-functional furniture), doing a quick 5-minute reset each evening, and being ruthless about what actually needs to live in the entry zone versus what can be stored elsewhere.
What lighting works best near the front door?
The best lighting for entryways includes: warm-temperature bulbs (2700-3000K) for a welcoming glow, wall sconces that provide directional light without taking up surface space, small table lamps (under 40cm/16in) if you have console space, and for renters, battery-operated puck lights or plug-in wall sconces. In Australian homes, consider lighting that complements rather than competes with natural light from nearby windows.
Can I do a gallery wall in a narrow hallway?
Yes, narrow hallways are excellent candidates for gallery walls. The key is maintaining consistent spacing (5-8cm/2-3in between frames) and using similar framing styles for cohesion. In Australian homes with long hallways, consider a linear arrangement that draws the eye through the space. For the most polished look, plan your layout on the floor first, and use pieces with a unifying element (colour scheme, subject matter, or frame style) to create a curated collection rather than a random assortment.
Creating Your Perfect Entryway Illusion
Even without architectural definition, you can create a welcoming, functional entryway using our simple formula: define a boundary, add a landing strip, incorporate a vertical anchor, use intentional lighting, and establish an arrival ritual. These elements work together to create not just the appearance of an entryway, but the function of one—organizing your everyday items and creating that crucial transition moment between outside and in.
Whether you're working with a small apartment, a rental property, or simply an open-plan layout, these principles can be adapted to your specific space and style preferences. For the finishing touch that truly elevates your entryway illusion, explore Rossetti Art's collection of canvas prints and original artwork designed to make a lasting first impression.
Leave a comment
This site is protected by hCaptcha and the hCaptcha Privacy Policy and Terms of Service apply.