
Walking past a beautifully arranged wall of art stops you in your tracks. The pieces speak to each other. They create a rhythm that pulls your eye across the space.
But staring at blank walls with a stack of frames leaning against the baseboard feels paralyzing. Where does the first piece go? How much space belongs between frames? Will you end up with a dozen nail holes that need patching?
Arranging art doesn't require a design degree. It asks for a few reliable principles and the confidence to trust your eye. This guide walks you through proven techniques that work for any room, any style, and any collection size.
Start With Your Wall Space
Before hanging a single piece, measure your available wall space. Grab a tape measure and note the width and height of your target area. Consider furniture placement—sofas, headboards, and console tables create natural boundaries.
The golden rule places art at eye level, typically 57 to 60 inches from the floor to the center of your piece. This measurement comes from gallery standards used in museums worldwide. Your eye naturally lands at this point when you enter a room.

Furniture changes this calculation slightly. When hanging art above a sofa or dining room buffet, leave 6 to 8 inches between the furniture top and the artwork's bottom edge. This spacing connects the pieces visually without making the art feel like it's floating away.
Large walls tempt you to hang small art that gets lost in the space. A useful guideline suggests your art should cover roughly two-thirds to three-quarters of the furniture width below it. A 90-inch sofa works well with art spanning 60 to 68 inches.
Five Gallery Wall Layout Methods That Work
Different arrangement styles create distinct moods. Some layouts bring order and calm. Others celebrate creative energy. Your room's architecture and your collection both influence which approach works best.
The Grid Layout
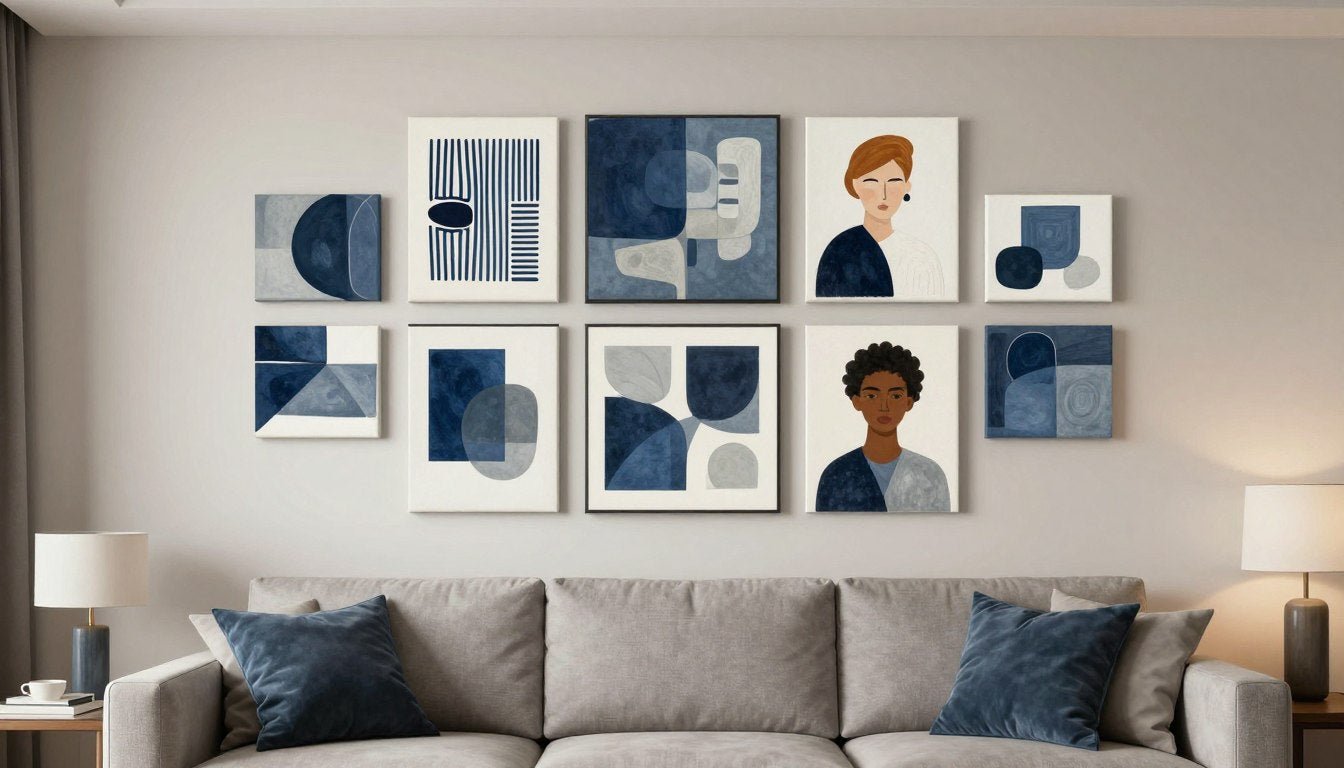
Grid arrangements create instant sophistication through symmetry. This method works beautifully with prints that share similar sizing and matching frames. The pieces align in neat rows and columns with consistent spacing throughout.

Try keeping 2 to 3 inches of space between each frame in a grid. This tight spacing makes the collection read as a single cohesive unit rather than individual pieces. Nine small prints arranged in a 3x3 grid create more impact than those same pieces scattered randomly.
Perfect for Grid Layouts: Abstract Geometric Prints

Clean lines and balanced compositions make these pieces ideal for symmetrical arrangements. Each print coordinates with the others while maintaining its own visual interest. The consistent sizing eliminates guesswork about spacing and placement.
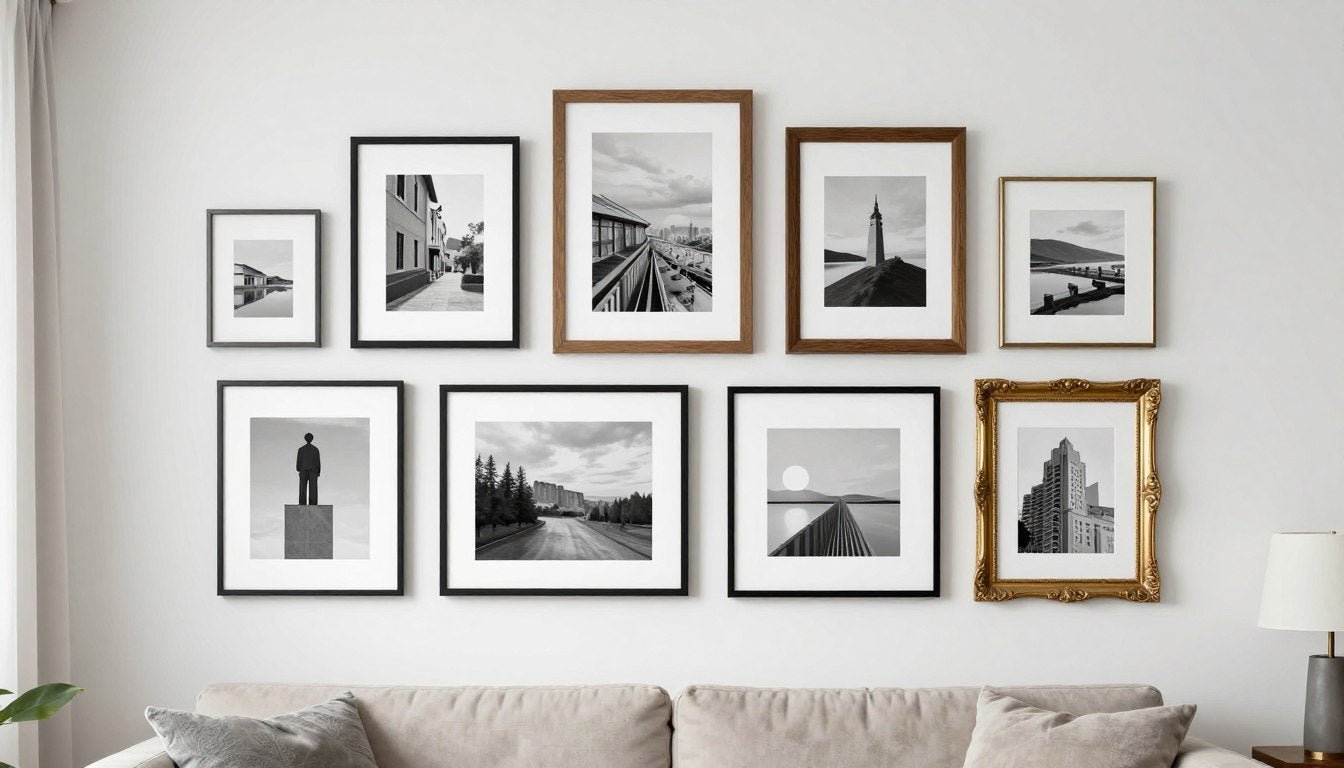
The Salon Style Wall
Salon hanging embraces organized chaos. This European tradition packs walls with art from floor to ceiling, mixing frame sizes, styles, and subject matter. The look feels collected over time rather than purchased all at once.
Start salon arrangements from the center and work outward. Place your largest or favorite piece first, then build around it with smaller works. Maintain roughly 2 to 3 inches between frames, but don't stress about perfect alignment.

This style forgives imperfection better than rigid layouts. If a piece doesn't work in one spot, move it. The overall visual weight matters more than precise measurements. Step back frequently to check the balance across the entire wall.
The Linear Arrangement
Linear layouts line up pieces horizontally with their center points aligned. This method works particularly well in hallways, above long pieces of furniture, or in rooms with strong horizontal lines.
You can hang pieces touching edge-to-edge for drama or space them 3 to 5 inches apart for a more relaxed feel. Varying the frame sizes adds interest while the aligned centers maintain order. Try placing your largest piece on one end rather than centering it—this creates unexpected visual movement.

The Scattered Organic Layout
Organic arrangements feel casual and personal. Pieces appear at different heights with varied spacing. This approach suits collections with mismatched frames or art acquired over years.
Despite the relaxed appearance, these arrangements still follow guidelines. Imagine a boundary line around your entire collection—usually a rectangle or square. Keep all pieces within this invisible frame to prevent the look from feeling truly random.
Try placing pieces on the floor first before hanging. Arrange and rearrange until the composition feels right. Take a photo to reference when you move to the wall. This floor method saves you from unnecessary holes in the wall.

The Statement Single Piece
Sometimes one large piece makes the strongest impact. A statement artwork needs room to breathe. Resist filling empty space around it with smaller pieces unless you're deliberately creating a balanced asymmetric arrangement.
Large-scale art works beautifully in dining rooms, bedrooms, or as a living room focal point. The single piece should feel substantial enough for the wall—generally filling at least 50% of the available space.
Coordinating Multiple Pieces
Hanging several pieces together creates challenges beyond single artwork placement. Color coordination, style consistency, and visual weight all factor into successful arrangements.
Color Connection
Your art pieces don't need to match exactly, but they should share some color thread. Pull one or two colors that repeat across multiple pieces. This connection helps separate artworks feel like an intentional collection.

Neutral frames help disparate art styles work together. Black, white, or natural wood frames act as visual bridges between pieces with different subjects or techniques. The frames become the common language your collection speaks.
Simplify Your Gallery Wall with Pre-Coordinated Sets
Our curated canvas print sets take the guesswork out of color coordination and composition. Each collection pairs complementary pieces designed to work together beautifully.
Size Relationships
Mixing frame sizes adds dynamism but requires thought about proportion. A common ratio uses one large anchor piece with medium and small supporting pieces. The large piece might be 24x36 inches, medium pieces 16x20 inches, and small pieces 8x10 inches.
Odd numbers of pieces typically look more appealing than even numbers. Three, five, or seven pieces feel more naturally balanced than two, four, or six. This guideline isn't absolute, but it's a useful starting point when you feel stuck.
Frame Style Decisions
Matching frames create cohesion. Mixed frames add personality. Both approaches work depending on your goal and existing room style. Matching frames suit modern spaces and grid layouts. Mixed frames complement eclectic or traditional rooms.

When mixing frame styles, limit yourself to two or three frame types maximum. Too much variety makes the wall feel chaotic rather than curated. You might mix black metal frames with natural wood, or combine ornate gold with simple white frames.
Getting the Spacing Right
Consistent spacing makes amateur arrangements look professional. The space between pieces matters as much as the art itself. That negative space gives your eye places to rest.
Standard spacing between frames runs 2 to 4 inches. Tighter spacing (2 inches) makes pieces read as a single unit. Wider spacing (4 inches or more) gives each piece room to stand alone while still contributing to the grouping.
Spacing Guidelines by Layout Type
- Grid layouts: 2-3 inches for cohesion
- Salon arrangements: 2-3 inches average, can vary
- Linear displays: 3-5 inches for relaxed feel
- Scattered layouts: 3-6 inches varied spacing
- Grouped clusters: 1-2 inches within groups, 4-6 inches between groups
Balance Considerations
Visual weight involves size, color intensity, and subject matter. A small dark painting can balance a large light one. Busy detailed pieces need more breathing room than minimalist works.
Test balance by taking a photo of your arrangement. Look at the image on your phone. Problem areas jump out in photos more clearly than when viewing in person.

Asymmetric balance often looks more interesting than perfect symmetry. Place a large piece off-center and balance it with several smaller pieces on the opposite side. This creates visual tension that keeps the eye moving.
Room-by-Room Arrangement Strategies
Different rooms call for adjusted approaches. The way you arrange art above a dining room table differs from bedroom walls or hallway galleries.
Living Room Walls
Living rooms offer the most flexibility for gallery walls. The main seating wall provides a natural focal point. Scale your arrangement to match furniture size. A sectional sofa can anchor a large gallery wall, while a loveseat works better with three to five pieces.

Consider the room's traffic flow. Gallery walls work best on walls you face when entering the room or sitting in main seating areas. Avoid placing major art arrangements behind where people typically sit—no one sees them there.
Dining Room Displays
Dining rooms suit more formal arrangements. The wall opposite the room entrance makes a strong statement. Keep art above the buffet or sideboard within the furniture's width to maintain proportion.
Dining room lighting affects how art appears. Pieces with strong contrast work better in rooms with dramatic overhead lighting. Subtle artwork might get lost when competing with a statement chandelier.

Bedroom Arrangements
Bedrooms benefit from calming arrangements. The wall behind your bed is prime real estate for art. Center a large piece or create a balanced grouping that spans roughly the bed's width.
Leaning art on a shelf or headboard offers flexibility. This approach lets you change pieces seasonally without new holes in the wall. Layer two or three pieces of different sizes for depth.

Hallway Galleries
Narrow hallways need careful consideration. Linear arrangements work beautifully here. Hang pieces at consistent height down the hallway's length, creating a progression you walk past.
Try placing pieces on both walls in a staggered pattern. As you walk down the hall, art appears on alternating sides. This approach works especially well with an odd number of pieces—three or five total.
Add Personality: Figurative Portrait Collection

Figurative pieces bring warmth and human connection to any space. These portraits work beautifully in bedrooms, hallways, and intimate dining areas where personal expression matters most.
Curated for Your Main Space

Our living room collection offers pieces specifically chosen for social spaces. From conversation-starting abstracts to serene landscapes, find works that set the right tone for where you gather.
Professional Hanging Techniques
The best arrangement fails without proper hanging technique. Understanding hardware options and installation methods prevents crooked frames and wall damage.
Essential Hanging Tools
Gather these supplies before starting: hammer, picture hangers rated for your frame weight, level, pencil, tape measure, and painter's tape. A laser level eliminates guesswork for multiple pieces.

Different wall types need different hardware. Drywall accepts standard picture hangers. Plaster walls work better with anchors. Concrete or brick requires masonry anchors and a drill with masonry bits.
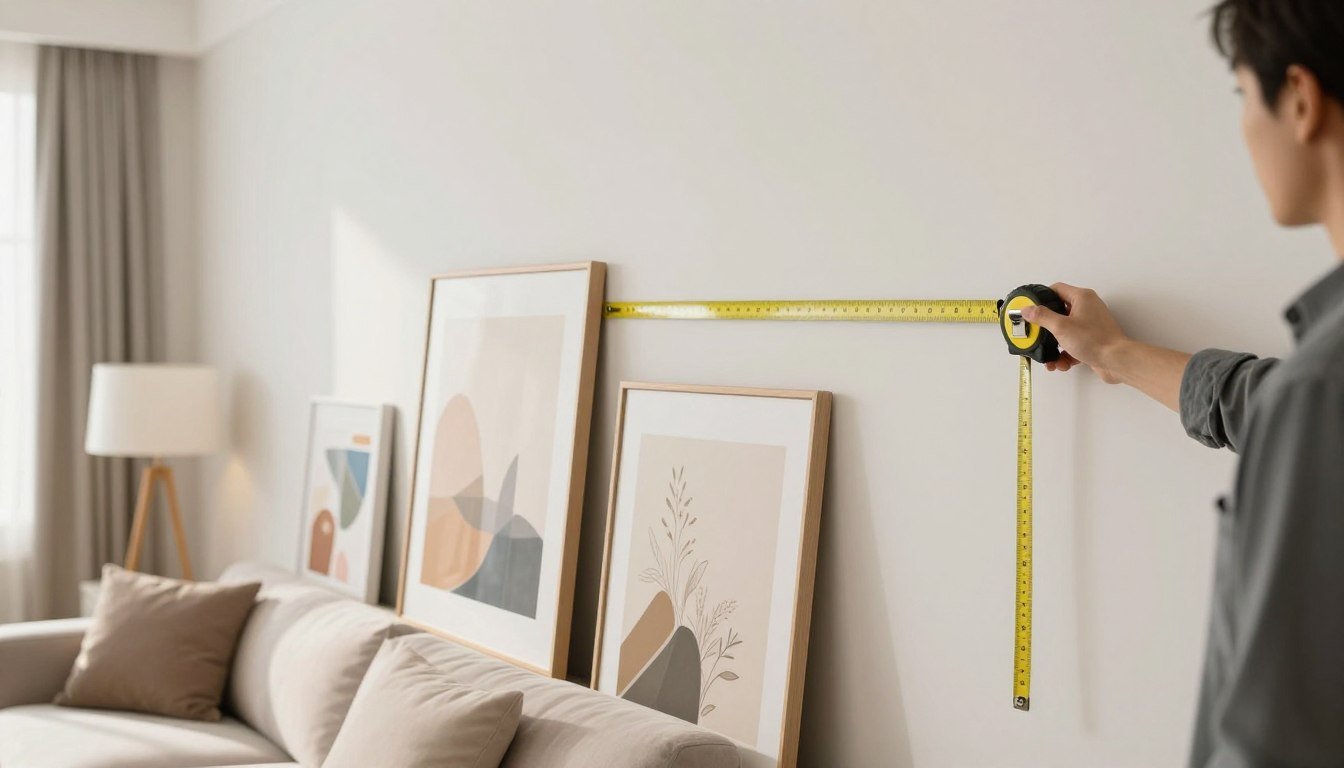
The Paper Template Method
Paper templates prevent measurement mistakes. Cut paper to match each frame's dimensions. Tape the paper pieces on the wall in your desired arrangement. Step back and adjust until it looks right.
Mark nail holes through the paper templates. Remove the paper and hang your actual pieces on the marked spots. This method works especially well for gallery walls with multiple pieces.
Alternatives to Nails
Command strips offer damage-free hanging for lightweight frames. Follow weight ratings carefully—exceeding limits leads to falling art. These strips work well for renters or those who rearrange frequently.
Picture rail molding provides ultimate flexibility. Install the rail along the top of your wall. Hang art from cables or chains attached to the rail. Move pieces without making new holes. This traditional option suits period homes particularly well.

Getting Pieces Level
Hang your piece, then step back. Even slightly crooked frames catch the eye. Use a small level on the frame's top edge to check. Make minor adjustments before the nail sets fully.
For frames with two hanging points, measure from each hanger to the frame top. If these measurements don't match, your frame hangs crooked even if you placed your nails perfectly. Adjust the wire or string between hangers to correct this.
Mistakes to Avoid
Certain arrangement errors show up repeatedly. Recognizing these helps you skip the trial-and-error phase.
Sizing and Scale Errors
- Hanging art too high—remember the 57-inch eye level rule
- Choosing pieces too small for the wall space
- Overcrowding—leaving no breathing room between pieces
- Ignoring furniture scale when planning arrangements
Style and Design Mistakes
- Mixing too many frame styles without a unifying element
- Forcing unrelated pieces together without color or theme connection
- Centering everything—off-center placement often looks more dynamic
- Forgetting to consider lighting when choosing placement

The Rush to Hang
The biggest mistake happens when you hang pieces immediately after moving in. Live with your space first. Notice where natural light falls. See which walls you actually look at daily. Some walls that seem perfect initially rarely catch your attention.
Give yourself permission to try placing art temporarily. Lean pieces against the wall for a few days. You'll discover whether that spot truly works before committing to holes.
Get Personalized Design Guidance
Every space brings unique challenges. Your wall dimensions, lighting conditions, existing furniture, and personal style all influence the perfect arrangement solution.

Maintaining Your Wall Art Display
Once your arrangement looks perfect, simple maintenance keeps it that way. Dust frames regularly with a microfiber cloth. Check hanging hardware twice yearly, especially for heavier pieces.
Refreshing Your Arrangement
Gallery walls don't need to stay static forever. Swap one or two pieces seasonally to keep the display feeling fresh. Replace a bright summer landscape with warmer autumn tones when seasons change.

Adding new pieces to an existing arrangement works better when you plan for growth from the start. Leave deliberate gaps or asymmetric spaces that welcome new additions as your collection expands.
Protecting Your Investment
Direct sunlight fades artwork over time. Position gallery walls away from windows receiving harsh afternoon sun, or use UV-protective glass in frames. Canvas prints hold up better to light exposure than paper-based artwork, but even these benefit from thoughtful placement.
Control humidity in rooms with art. Bathrooms and kitchens see moisture fluctuations that can damage frames and artwork. If hanging art in these spaces, ensure proper ventilation and choose pieces specifically made to withstand humidity.
Transform Your Empty Walls
The wall you've been staring at for months holds potential. Whether you hang a single statement piece or build a salon-style collection, the principles remain consistent: consider your space, respect proportions, and trust the process.

Start with one arrangement. Try the paper template method for your first gallery wall. Give yourself permission to adjust pieces until they feel right. The beauty of wall art lies partly in its impermanence—you can always move things.
Your collection tells your story. The landscapes you love, abstracts that make you stop and think, portraits that add personality—these pieces deserve thoughtful placement that honors both the art and your space.
Ready to Transform Your Walls?
Explore our complete collection of premium canvas prints designed to make arrangement effortless. Find pieces that speak to your style and work beautifully together in any configuration.
Leave a comment
This site is protected by hCaptcha and the hCaptcha Privacy Policy and Terms of Service apply.