
Transforming a blank wall into a stunning gallery starts with knowing exactly how to hang art on a wall. Whether you're working with a single statement piece or creating an elaborate gallery wall, the right hanging techniques make all the difference between a space that feels incomplete and one that truly feels like home. This comprehensive guide walks you through every step of the process, from finding the perfect height to arranging multiple pieces with confidence.
Many homeowners struggle with artwork placement, worried about damaging walls or making irreversible mistakes. The good news is that hanging art doesn't have to be complicated. With the right measurement techniques and a few professional tips, you'll achieve museum-quality results in your own space.
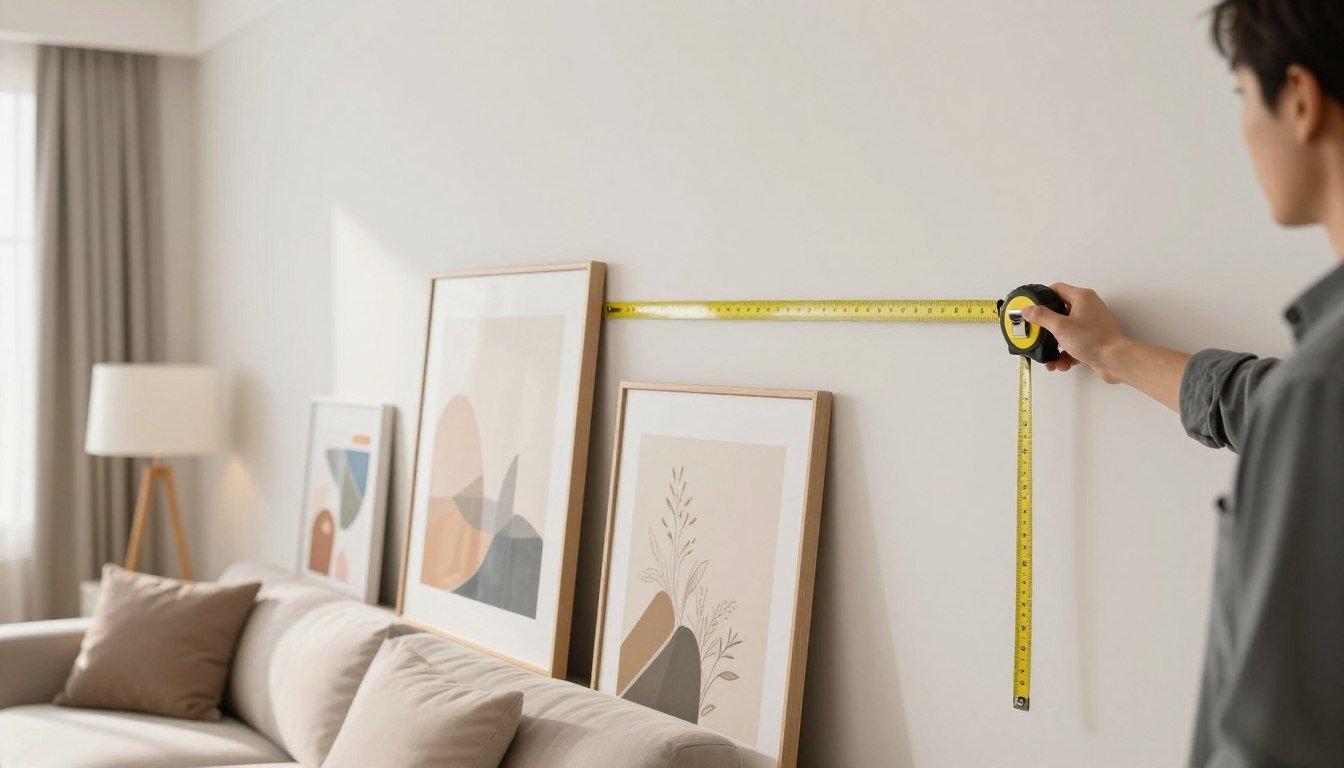
Understanding the Eye Level Rule for Hanging Artwork
The most fundamental rule for hanging artwork centers on eye level placement. Professional galleries position art so the center point sits at average eye level, typically between 57 and 60 inches from the floor. This measurement represents the average human eye height and creates the most comfortable viewing experience for most people.
To apply this rule, measure 57 to 60 inches up from your floor and mark this point lightly with pencil. This mark represents where the center of your artwork should sit, not the top or bottom. For rooms where people primarily sit, such as dining rooms, you might lower this measurement slightly to 55 inches to accommodate seated eye level.
Keep in mind that average eye level works as a starting point, but personal preference matters too. If household members are particularly tall or short, adjust these measurements by a few inches to ensure the artwork feels right for your space and your family.

Calculating the Hanging Point
Once you've identified your eye level mark, you need to calculate where to place your picture hanging hook. This calculation involves a simple formula that accounts for your frame height and hanging hardware.
This mathematical approach ensures your artwork center lands exactly at eye level, regardless of frame size or hanging hardware type. Write down these measurements before you start drilling to avoid errors.
Gallery Wall Ideas and Creative Layout Strategies

Gallery walls have become one of the most popular ways to display art collections, transforming empty walls into dynamic focal points. The key to successful gallery wall arrangement lies in planning your layout before making a single hole in the wall. This preparation saves time, prevents mistakes, and ensures a cohesive final result.
Grid Layout Patterns
Grid layouts work best when you have multiple pieces of similar size and want a clean, organized appearance. Arrange frames in evenly spaced rows and columns, maintaining consistent spacing between each piece. A spacing of two to three inches between frames creates visual breathing room while maintaining unity.
For a modern grid approach, consider using identical frames throughout. This creates a museum-like aesthetic that puts the focus entirely on the artwork itself rather than the frames. Grid layouts work particularly well in contemporary spaces and over furniture pieces like sofas or console tables.
Salon Style Arrangements
Salon style hanging embraces a more eclectic, collected-over-time aesthetic. This approach mixes frame sizes, colors, and artwork styles for an organic, lived-in feel. Start by laying out your entire collection on the floor, experimenting with different arrangements until you find a composition that feels balanced.
When creating salon walls, maintain consistent spacing between all pieces, even though the frames vary in size. This consistent spacing of two to four inches creates cohesion despite the visual variety. Place your largest or most eye-catching piece first, then build around it with smaller works.
Ready to Create Your Perfect Gallery Wall?
Discover our curated collection of canvas print sets, designed to work beautifully together. Each set takes the guesswork out of gallery wall creation with pre-coordinated designs and sizes.
Symmetrical Balance Layouts
Symmetrical arrangements create a sense of formality and calm. Center a large statement piece on your wall, then flank it with matching smaller pieces on either side. This approach works exceptionally well in traditional spaces or above beds and mantels where symmetry feels natural.
To execute symmetrical layouts successfully, measure carefully to ensure equal spacing on both sides of your central piece. Use a level to make sure all pieces align horizontally. The symmetry should feel intentional and precise, not approximate.
How High to Hang Art in Different Rooms

Living Room Artwork Placement
Living rooms present unique hanging challenges because they contain both standing and sitting viewing angles. When hanging art above furniture like sofas, maintain a six to eight inch gap between the furniture top and the bottom of your frame. This spacing creates visual connection without making the art feel like it's sitting directly on the furniture.
For standalone walls without furniture, return to the standard eye level rule of 57 to 60 inches to the artwork center. In rooms with high ceilings, you might be tempted to hang art higher, but resist this urge. Artwork hung too high loses its visual impact and connection with the room's occupants.
Consider the room's primary function when determining height. If your living room is mainly for entertaining while standing, you might raise artwork slightly. For spaces where people primarily sit and relax, keeping art at standard eye level or slightly lower ensures comfortable viewing from seated positions.
Transform Your Living Room with Museum-Quality Canvas Art
Browse our living room collection featuring stunning abstract, figurative, and modern designs. Free shipping, 30-day returns, and ready-to-hang convenience make decorating effortless.
Bedroom Art Height Guidelines
Bedrooms benefit from artwork positioned slightly lower than standard eye level, especially for pieces hung above the bed. Since you view bedroom art primarily while lying down or sitting on the bed, positioning the artwork center at 55 to 57 inches creates better visual engagement.
When hanging art above your headboard, leave approximately five to nine inches of space between the headboard top and the frame bottom. This proportion ensures the artwork feels connected to the bed without overwhelming the space. For king-sized beds, consider a larger single piece or a set of two to three coordinated works to fill the wall space appropriately.

Hallway and Stairway Considerations
Hallways and stairways require special attention to hanging height because viewers experience the art while moving through the space. In straight hallways, maintain the standard 57 to 60 inch eye level rule for consistency and comfort.
Stairways present a unique challenge. Rather than stepping the artwork up with the stairs, maintain a consistent relationship between each piece and its adjacent stair tread. Measure the same distance up from each step, creating a diagonal line that follows the staircase angle while keeping individual pieces at a consistent height relative to their position.
For narrow hallways, consider slightly smaller pieces that don't overwhelm the space. Leave adequate clearance for people walking past without bumping frames. A good rule of thumb maintains at least four inches of clearance from the edge of the frame to any corner or doorway.
Create a Calming Bedroom Sanctuary
Our bedroom canvas collection features soothing abstracts, serene landscapes, and peaceful designs perfect for creating your personal retreat.
Canvas Wall Art Hanging Techniques and Hardware Selection

Canvas wall art requires specific hanging approaches depending on whether you're working with stretched canvas, framed canvas, or canvas prints. Understanding your canvas type helps you select appropriate hardware and hanging methods for secure, long-lasting installation.
Stretched Canvas Installation
Stretched canvases typically come with hanging wire or D-rings attached to the back of the wooden frame. For lightweight canvases under five pounds, simple picture hooks rated for the appropriate weight work perfectly. Drive the hook into the wall at a slight upward angle for maximum holding power.
Medium-weight canvases between five and fifteen pounds benefit from wall anchors. If you're hanging on drywall without hitting a stud, use plastic anchors or toggle bolts rated for your artwork weight. Insert the anchor first, then screw in your hook or hanger, ensuring everything sits flush and secure against the wall.
Heavy canvases over fifteen pounds require serious support. Locate wall studs using a stud finder and drive screws directly into the studs whenever possible. For large pieces, use two hanging points instead of one to distribute weight evenly and prevent the frame from tilting.
Picture Hanging Tips for Professional Results
Choosing the Right Hardware
Hardware selection makes the difference between artwork that stays securely in place and pieces that shift, tilt, or fall. Picture hooks come in various weight ratings clearly marked on the packaging. Choose hooks rated for at least twice your artwork's actual weight to ensure adequate support with a safety margin.
Wall anchors expand behind drywall to create holding power where no stud exists. Plastic expansion anchors work for lightweight pieces, while toggle bolts provide superior strength for heavier artwork. Self-drilling anchors offer convenience but less holding power than traditional toggle bolts.
For plaster walls, specialized plaster hooks distribute weight across a larger surface area, reducing the risk of cracking. Avoid using standard drywall anchors in plaster, as they don't provide adequate support and may damage the wall surface.

Wall Art Placement and Professional Spacing Rules
The space between artwork pieces affects how your entire wall arrangement feels. Too close, and pieces compete for attention. Too far apart, and the collection feels disconnected. Professional designers rely on consistent spacing rules to create cohesive, intentional-looking displays.
Spacing Between Multiple Pieces
For gallery walls and grouped arrangements, maintain two to four inches of space between frames. This measurement should remain consistent throughout your entire arrangement, creating rhythm and unity. Measure the space between frames rather than eyeballing it, as small discrepancies become obvious once artwork is hung.
When hanging a horizontal row of same-sized pieces, keep three to six inches between frames. This wider spacing allows each piece to breathe while still feeling connected to its neighbors. Align the tops or bottoms of frames for a clean, intentional look that guides the eye horizontally across your wall.

Proportional Relationships with Furniture
Artwork should relate proportionally to the furniture below it. A general rule suggests artwork width should measure two-thirds to three-quarters of the furniture width beneath it. For a standard sofa measuring 90 inches wide, look for artwork or groupings spanning 60 to 68 inches across.
This proportional relationship creates visual balance and makes spaces feel well-designed and intentional. When working with multiple pieces above furniture, treat the entire grouping as one unit and apply the two-thirds rule to the total width of all pieces combined, including the spaces between them.
Focal Point Creation
Every room benefits from a clear focal point, and artwork often serves this purpose beautifully. Choose your most impactful piece for the wall first visible when entering the room. This strategic placement immediately draws the eye and sets the tone for your entire space.
Support your focal point by keeping surrounding walls less busy. If you create an elaborate gallery wall on one side of the room, balance it with simpler arrangements or blank space on opposing walls. This contrast prevents visual overwhelm and allows your main display to truly shine.
Quick Reference: Spacing Guidelines
- Between gallery wall pieces: 2-4 inches
- Between horizontal row pieces: 3-6 inches
- Above furniture: 6-8 inches minimum
- From ceiling: 8-12 inches minimum
- Artwork to furniture width ratio: 2/3 to 3/4

How to Arrange Art on a Wall by Room and Style

Modern and Minimalist Arrangements
Modern minimalist spaces thrive on simplicity and intentional empty space. Rather than filling every wall, choose one or two statement pieces per room. Hang a single oversized canvas on your main wall, allowing generous negative space around it to let the artwork breathe and command attention.
When selecting art for minimalist spaces, consider pieces with bold geometric shapes, abstract compositions, or monochromatic color schemes that complement your room's restrained palette. The frame should disappear into the background, with simple black, white, or natural wood frames working best.
Traditional and Classic Layouts
Traditional rooms welcome more elaborate arrangements and ornate frames. Symmetrical layouts work beautifully in classic spaces, with matched pairs of artwork flanking windows, mantels, or doorways. Choose frames with decorative molding and consider matting artwork for a more formal presentation.
In traditional dining rooms, hang artwork lower than standard eye level to account for seated viewing. A beautiful landscape or still life positioned at 52 to 55 inches center height creates perfect engagement for dinner guests. Layer in additional pieces on adjacent walls for a collected, sophisticated look.
Elevate Your Space with Abstract Geometric Art
Our abstract geometric collection features bold, contemporary designs perfect for modern interiors. Museum-quality canvas prints with sophisticated floater frames.
Eclectic and Bohemian Styles
Eclectic spaces celebrate mixing styles, eras, and frame types for a collected, personal aesthetic. Layer artwork of different sizes and orientations, combining paintings, prints, photographs, and textile pieces. Don't worry about matching frames perfectly; variety adds to the charm and authenticity of this approach.
Start your eclectic arrangement by placing your largest or most colorful piece first, then build around it with smaller works. Overlap frames slightly for added dimension and visual interest. This layered approach works especially well on shelves and mantels where you can lean rather than hang pieces.

Common Picture Hanging Mistakes to Avoid
Even experienced decorators make hanging mistakes that diminish their artwork's impact. Recognizing these common errors helps you avoid them and achieve professional-looking results from your first attempt. Learning what not to do proves just as valuable as mastering proper techniques.
Hanging Art Too High
The most frequent mistake involves hanging artwork too high on the wall. Many people instinctively hang art at their own eye level while standing and reaching up, resulting in pieces positioned several inches too high for comfortable viewing. Remember that the center of your artwork, not the hook, should sit at 57 to 60 inches from the floor.
This error becomes especially obvious in rooms with standard eight-foot ceilings, where high-hung art creates awkward proportions and makes ceilings feel lower. If you find yourself tilting your head back to comfortably view artwork, it's definitely hung too high and should be lowered.
Ignoring Wall Anchors
Another critical mistake involves skipping wall anchors when hanging on drywall without studs. A simple nail driven into drywall provides minimal holding power and will eventually pull out, potentially damaging both your wall and your artwork. Always use appropriate anchors rated for your artwork's weight when studs aren't available.
Top Hanging Mistakes
- Positioning artwork too high above furniture or eye level
- Using inadequate hardware for artwork weight
- Failing to use a level, resulting in crooked frames
- Hanging pieces too far apart, losing visual connection
- Choosing artwork too small for the available wall space
- Placing multiple pieces at different heights randomly
- Ignoring furniture proportions when sizing artwork

Poor Proportion Choices
Selecting artwork too small for your wall space creates a disconnected, unfinished look. A tiny piece on a large wall appears lost and fails to make the visual impact you desire. When in doubt, size up rather than down, or group multiple smaller pieces to create adequate visual weight for your space.
Conversely, oversized art in small rooms can overwhelm the space. While large-scale art makes a bold statement, ensure your room dimensions can support the piece without making the space feel cramped. Leave adequate breathing room around large pieces, maintaining at least eight inches from ceiling and walls.
Special Considerations for Different Wall Types and Artwork

Working with Plaster and Brick Walls
Older homes with plaster walls require extra care during installation. Plaster is harder than drywall but also more brittle and prone to cracking. Use specialized plaster hooks designed to distribute weight across a larger surface area, reducing stress on the wall material.
Before drilling into plaster, place a small piece of painter's tape over your mark. This simple step prevents the plaster from chipping or cracking as you drill. Use a masonry bit and drill slowly with steady pressure rather than forcing the bit through quickly.
Brick walls present unique challenges and opportunities. Whenever possible, drill into the mortar rather than the brick itself, as mortar is softer and easier to penetrate while still providing excellent holding power. Use masonry anchors specifically designed for brick and mortar applications.
Hanging Heavy and Oversized Pieces
Large canvases and heavy framed pieces demand extra attention to hanging hardware and technique. For any piece weighing more than twenty-five pounds, use two hanging points instead of relying on a single hook. This dual-point system distributes weight more evenly and prevents the frame from tilting or shifting over time.
Locate wall studs using a stud finder and plan your hanging points to hit at least one stud. For pieces wider than the standard sixteen-inch stud spacing, you may need to use a combination of stud-mounted and anchor-supported hanging points. Professional picture rails offer another solution for heavy pieces, allowing you to hang artwork without drilling into walls at all.
Weight Capacity Guidelines
Standard picture hook: Up to 5 pounds
Heavy-duty picture hook: 5-15 pounds
Wall anchors with screws: 15-30 pounds
Toggle bolts: 30-50 pounds
Stud-mounted screws: 50+ pounds
Always check manufacturer specifications and add a safety margin when selecting hardware for valuable artwork.

Temporary Solutions for Renters
Renters face the challenge of decorating without damaging walls or losing security deposits. Fortunately, several damage-free hanging solutions exist that work surprisingly well for lightweight to medium-weight artwork. Command strips rated for picture hanging support pieces up to eight pounds without nails or screws.
For heavier pieces, consider investing in a leaning strategy rather than hanging. Large canvases can rest directly on the floor or lean against walls on console tables and shelves. This approach works especially well with oversized statement pieces and creates a relaxed, gallery-inspired aesthetic.
Picture rails installed with minimal wall damage offer another rental-friendly solution. These horizontal rails attach to walls with a few discrete mounting points and allow you to hang and rearrange artwork using cables or wires without additional holes. When you move, simply patch the rail mounting holes.
Essential Tools and Materials for Hanging Artwork

Having the right tools on hand before you start hanging makes the process faster, easier, and more accurate. While you don't need professional-grade equipment, a few key items ensure successful results every time you hang artwork.
Measuring and Marking Tools
A quality tape measure is essential for accurate measurements. Choose one at least twenty-five feet long to handle large spaces and multiple-piece arrangements. A laser measuring tool offers even greater precision and makes solo measuring easier.
Keep a pencil with a good eraser handy for marking hanging points. Avoid pens or permanent markers that show through paint if you need to adjust your marks. A small level, preferably twenty-four inches long, ensures frames hang perfectly straight.
Installation Hardware

Optional but Helpful Items
While not essential, several additional tools make hanging easier and more precise. A paper template or kraft paper allows you to mock up gallery wall arrangements before making any holes. Simply trace your frames onto paper, cut them out, and tape the templates to your wall to visualize the final arrangement.
A laser level projects a perfectly straight horizontal or vertical line across your wall, making it easier to align multiple pieces or ensure level placement. This tool particularly helps when hanging a row of same-sized pieces or creating grid layouts.
Cork or felt pads stick to the bottom corners of frames and protect your walls from scratches while keeping artwork level. These small pads prevent frames from shifting and create a tiny buffer between the frame and wall surface.
Maintaining and Adjusting Your Displayed Artwork
After successfully hanging your artwork, ongoing maintenance ensures pieces stay level, secure, and looking their best for years to come. Regular checks catch problems early, before valuable pieces shift, fall, or sustain damage.
Regular Inspection Schedule
Check hanging artwork quarterly to ensure hooks remain secure, frames stay level, and no shifting has occurred. Gently tug on frames to verify they're firmly attached to the wall. Use your level to confirm pieces remain straight, adjusting as needed.
Pay special attention to artwork in high-traffic areas or near doors where vibrations from daily activity can gradually shift frames. Pieces hung on exterior walls may also shift as temperature changes cause slight wall expansion and contraction. A quick monthly visual check in these locations prevents problems from developing.
Cleaning and Care
Dust accumulates on frame tops and glass surfaces, diminishing your artwork's appearance over time. Dust frames monthly using a soft microfiber cloth, working gently to avoid shifting the piece. For glass-covered artwork, use streak-free glass cleaner applied to your cloth rather than sprayed directly on the glass.
Canvas prints require more delicate care. Avoid touching the canvas surface directly, as oils from your hands can damage the material over time. If dust accumulates on canvas, use a very soft, clean paintbrush to gently sweep it away. Never use liquid cleaners or water on canvas surfaces.
Monitor artwork for signs of sun damage, especially pieces hung in rooms with southern exposure. Fading, color shifting, or yellowing indicates UV damage. Consider moving valuable pieces away from direct sunlight or installing UV-filtering window film to protect your investment.

When to Rehang or Adjust
Several situations warrant removing and rehanging artwork. If you notice a frame sitting crooked despite adjustments, the hanging hardware may have loosened or shifted. Remove the piece, check the hardware, and reinstall using fresh anchors or different hanging points if needed.
Room redesigns or furniture rearrangement often require adjusting artwork height and position. When you move a sofa or add new furniture, reassess your artwork placement to ensure proper proportional relationships. Don't be afraid to experiment with new arrangements as your space evolves.
Seasonal rotation keeps your home feeling fresh and protects artwork from prolonged light exposure. Consider rotating pieces between rooms every six months, giving each work a rest period away from direct light while refreshing the look of multiple spaces simultaneously.
Transform Your Walls with Confidence

Mastering how to hang art on a wall opens up endless possibilities for personalizing your space and creating a home that truly reflects your style. From understanding the eye level rule to executing complex gallery walls, these techniques empower you to display artwork with the same professional results you see in galleries and design magazines.
The key principles remain consistent across all hanging projects. Measure carefully, use appropriate hardware, maintain consistent spacing, and trust the eye level rule to guide your placement decisions. Whether you're hanging a single statement piece or creating an elaborate collection wall, these fundamentals ensure success.
Remember that hanging art is not permanent or irreversible. Holes can be patched, arrangements can be adjusted, and layouts can evolve as your taste and space change over time. The most important step is simply getting started and bringing those beautiful pieces off the floor and onto your walls where they belong.
Ready to Transform Your Space with Beautiful Canvas Art?
Explore Rossetti Art's complete collection of museum-quality canvas prints, available in the largest sizes on the market. Each piece arrives ready to hang with premium floater frames, free worldwide shipping, and a 30-day satisfaction guarantee. Use our exclusive Live Preview tool to visualize artwork in your actual space before purchasing.
Your Perfect Canvas Awaits
Every Rossetti Art canvas print features handcrafted poplar hardwood floater frames, archival-quality printing, and comes signed by the artist. With production facilities in the US, UK, Canada, Australia, and Europe, you'll receive your artwork in just 5-10 business days with no customs fees. Transform your walls today with art that arrives ready to hang and built to last.


Leave a comment
This site is protected by hCaptcha and the hCaptcha Privacy Policy and Terms of Service apply.