
Hanging pictures seems simple until you hammer that first nail. Should the center of the art align with your eye level? Does furniture change the rules? What about those impressive gallery walls you see everywhere?
Getting the right height makes art feel perfectly placed. Get it wrong and the whole room feels off balance. This guide covers everything you need for flawless picture placement in every room of your home.
We'll explore the eye level rule, furniture coordination, and room-specific tips. You'll learn professional secrets that interior designers use daily. Your walls will never look the same.
The Eye Level Rule: Your Starting Point for Perfect Picture Placement
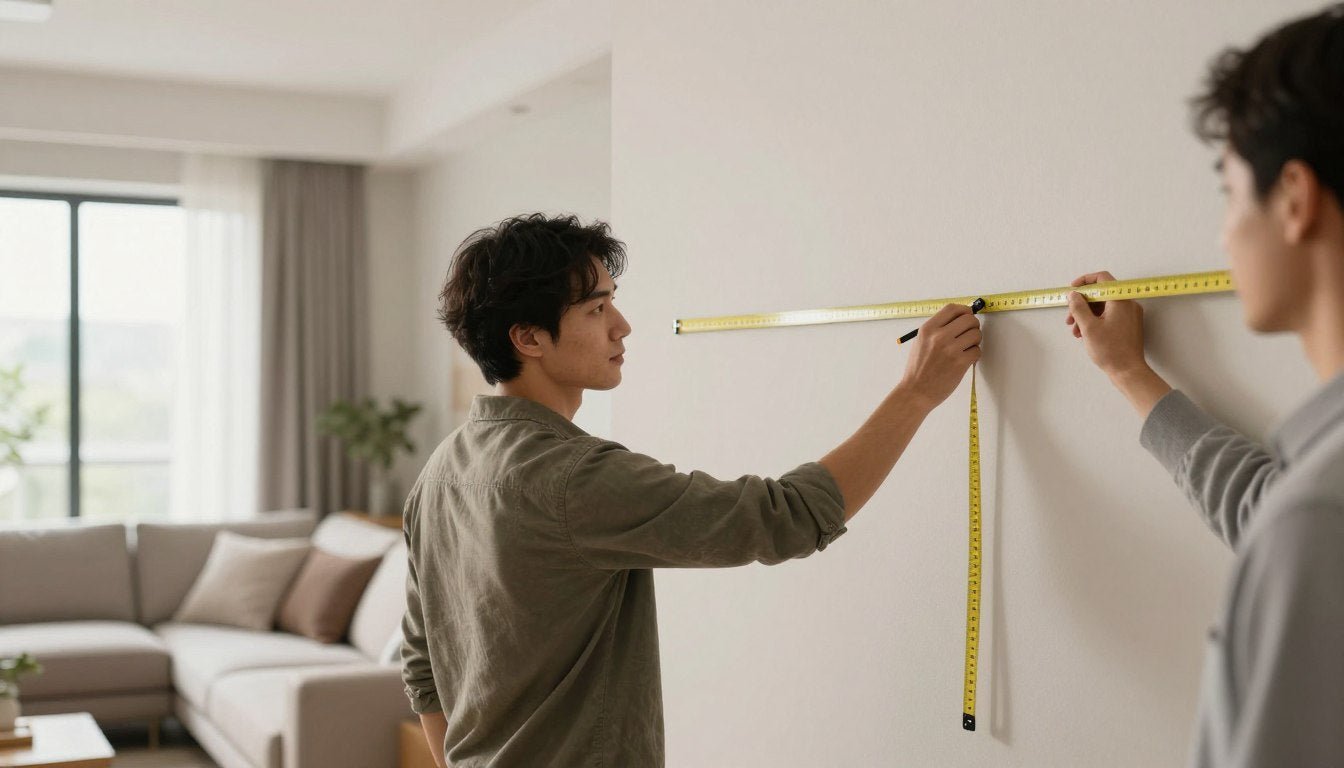
The standard rule says hang pictures so the center point sits at eye level. For most people, that means 57 to 60 inches from the floor to the center of the art piece.
This measurement comes from art galleries worldwide. Museums use this height because it works for the average person. Your home should follow the same principle for professional results.

Measure from the floor to 57 inches up your wall. Mark this spot lightly with a pencil. This becomes your center reference point for any piece of art you hang.
The eye level guideline works for most artwork in most spaces. You might adjust slightly based on ceiling height or furniture placement. But this remains your foundation for every hanging decision.
When choosing canvas prints for your home, remember that the center point matters more than where the top or bottom frame sits. Large pieces will extend above and below your 57-inch mark.
Choosing the Right Art for Perfect Eye-Level Display
Size and style matter when planning your wall. These curated prints work beautifully at standard hanging heights and complement various interior design aesthetics.

Portrait Canvas Prints
Vertical orientation naturally aligns with eye level principles. Perfect for entryways and narrow wall spaces where height matters most.

Abstract Canvas Prints
Bold designs draw the eye naturally to center. These pieces command attention at proper height without overwhelming your space.

Black & White Canvas Prints
Timeless versatility fits any room. Monochrome pieces adapt to different lighting conditions and furniture arrangements with ease.
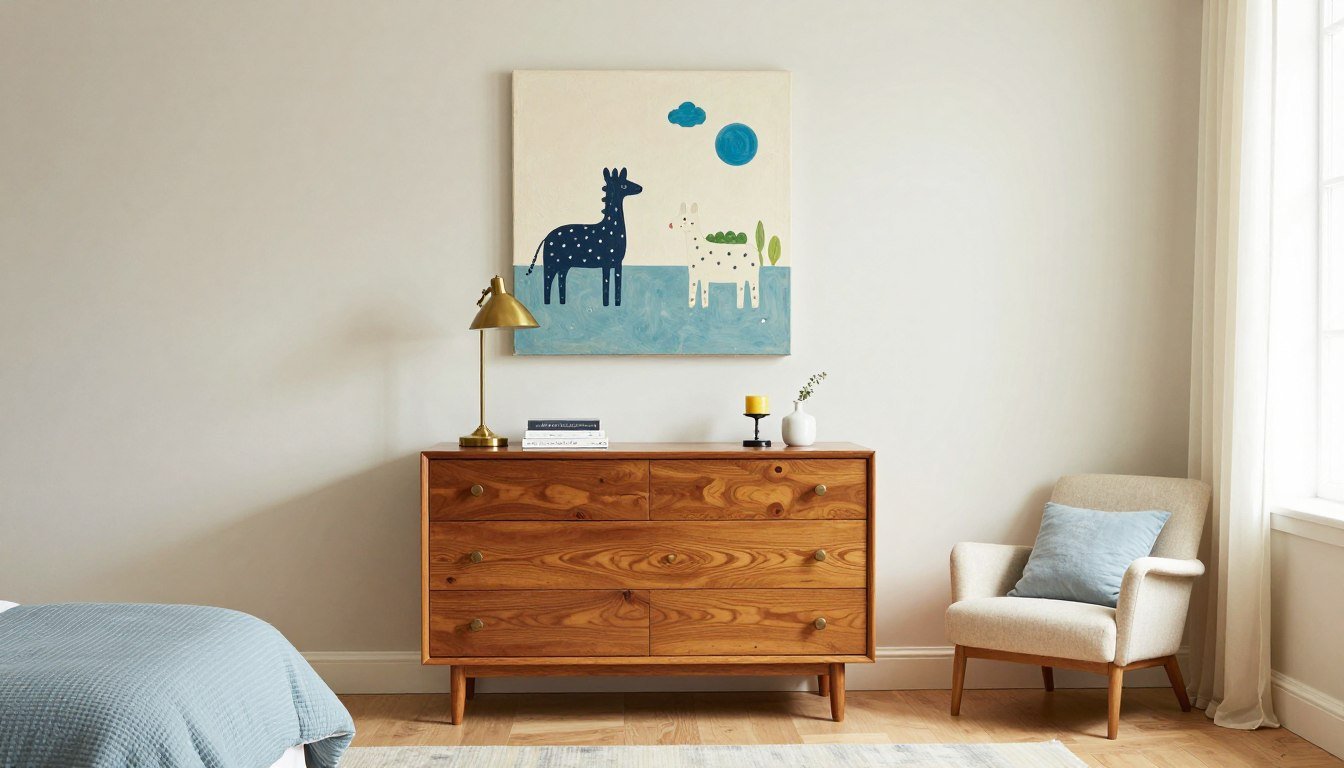
How to Hang Pictures Above Furniture: The 6 to 12 Inch Rule
Furniture changes everything about picture placement. When hanging art above a sofa, console table, or bed, the standard eye level rule needs modification.
Leave 6 to 12 inches between the top of your furniture and the bottom frame of your artwork. This creates visual connection without making pieces feel cramped or disconnected.

The bottom frame should hover close enough to relate to the furniture below. Too high creates an awkward gap that breaks the room's visual flow. Too low makes the art feel squished.
For living room wall art above your sofa, measure from the sofa back to determine your starting point. Add 8 inches upward and mark where the bottom of your frame should sit.
Measuring Above Different Furniture Heights
Low furniture like modern sofas allows more flexibility. The 6-inch minimum still applies, but you can extend to 10 or 12 inches for larger pieces of art.
Tall furniture like headboards or console tables needs tighter spacing. Stick closer to the 6 to 8 inch range to maintain proportion. The goal is making furniture and art feel like one cohesive grouping.

Dining room sideboards present unique challenges. These pieces often sit lower than sofas. You can push toward the 12-inch spacing for artwork above dining furniture without losing connection.
Room-by-Room Picture Hanging Height Guidelines
Each room in your home has different sight lines and purposes. Where you hang pictures should adapt to how people use and view each space.
Living Room Picture Height
Living rooms get viewed from seated positions most often. The standard 57 to 60-inch rule works perfectly here since people sit on sofas at eye level with properly hung art.
Consider your room's primary seating arrangement. If everyone sits facing one wall, that wall deserves your best pieces at perfect height. Side walls can go slightly higher since people view them while standing.

Large living rooms with high ceilings can handle bigger artwork hung slightly higher. Add 2 to 3 inches to the standard measurement in rooms with ceilings over 9 feet tall.
Bedroom Picture Placement
Bedrooms need art positioned for viewing from both standing and lying down. Focus on the standing view since that's how you'll see pieces most often.
Above the bed, maintain that 6 to 8 inch space from your headboard to the bottom frame. The piece should feel anchored to the bed without crowding it.
Choose bedroom canvas prints that create calm rather than visual chaos. Softer colors and simpler compositions work best in rest spaces.
Entryway and Hallway Heights
Entryways get viewed while walking, so standard eye level height works perfectly. People pass through these spaces standing, making 57 to 60 inches from the floor ideal.
Narrow hallways benefit from vertical pieces that draw eyes upward. This makes tight spaces feel taller and less cramped.

For entryway wall art, consider what guests see first. This prime real estate deserves a statement piece at perfect height to make strong first impressions.
Bathroom and Kitchen Considerations
Bathrooms often have lower sight lines due to mirrors and vanities. Hang art between 48 to 54 inches from the floor in small bathrooms to keep things proportional.
Kitchen art should avoid areas near stoves or sinks where moisture and heat cause damage. Higher placement protects artwork while keeping it visible during meal prep.
Match Art Style to Your Room's Height Requirements
Every room has unique dimensions and purposes. Find curated collections designed specifically for the spaces where you spend time. From cozy bedrooms to impressive living areas, discover art that fits perfectly.
Creating Gallery Walls: Spacing and Height Balance
Gallery walls let you display multiple pieces together as one cohesive grouping. The entire collection should center around that 57 to 60-inch eye level mark.
Think of your gallery wall as one large piece of art. Find the center point of the entire grouping, not individual pieces. That center should hit standard eye level height.

Space individual pieces 2 to 3 inches apart. Closer spacing makes the gallery feel cohesive. Wider spacing fragments the look and weakens visual impact.
Planning Your Gallery Wall Layout
Start with your largest piece as the anchor. Place it at or slightly above center height. Arrange smaller pieces around this focal point to create balance.
Lay your entire gallery arrangement on the floor first. Take a photo from above to see how pieces relate. Make adjustments before putting any holes in your wall.
Pre-made canvas print sets eliminate guesswork. These curated groupings come designed to work together at proper spacing and heights.
Common Gallery Wall Mistakes
Hanging pieces too far apart is the biggest gallery wall error. That museum-style 2 to 3-inch spacing creates intentional unity that wider gaps destroy.
Mixing too many frame styles creates visual chaos. Stick to 2 or 3 frame variations maximum. Let the artwork provide variety, not the frames.
Forgetting the center point rule is another frequent mistake. Your entire grouping must center around eye level, even if individual pieces extend much higher or lower.
Adjusting Picture Height for High Ceilings and Unique Spaces
High ceilings change how we perceive wall space. Rooms with ceilings over 9 feet tall can accommodate artwork hung slightly higher than standard recommendations.
Add 3 to 6 inches to the standard 57-inch rule in rooms with high ceilings. This prevents art from feeling too low and lost in expansive wall space.

The best way to judge high ceiling placement is stepping back 10 feet. If art disappears into the wall, it needs to move up. If it dominates your sightline uncomfortably, bring it down slightly.
Stairway Picture Hanging
Stairways present unique challenges since your eye level changes with each step. Follow the angle of the stairs with your picture arrangement.
Measure 60 inches from each stair tread up to create an ascending line. This keeps pieces at consistent eye level as you climb or descend.
Space stairway pictures consistently along this diagonal line. Treat the arrangement like a gallery wall that follows your staircase angle rather than sitting horizontally.
Corner and Narrow Wall Spaces
Corners need special attention since you view them from angles rather than straight on. Center your art on the wall space, ignoring the corner itself.
Narrow wall sections between windows or doors should get smaller pieces. Large artwork overwhelms limited space and makes rooms feel crowded.
The center point rule still applies on narrow walls. Measure your available wall width, find the center, and hang your piece there at standard height.
Professional Measuring and Hanging Techniques
Precise measurement prevents costly mistakes. You need just a few tools: a measuring tape, pencil, level, and appropriate hanging hardware for your wall type.
The Simple Formula for Perfect Placement
Start by measuring your artwork height. Divide that number in half. Add the result to 57 inches. This gives you the height where the top of your frame should sit.
For example: A 24-inch tall piece divided by 2 equals 12 inches. Add 12 to 57 and your nail or hook goes at 69 inches from the floor to the top of the frame.

Account for your hanging hardware. Measure from the top of your frame to where the wire or hook sits when pulled taut. Subtract this measurement from your marked height.
Choosing the Right Anchors and Hardware
Drywall needs anchors for anything heavier than 5 pounds. Plastic anchors work for light pieces. Metal toggle anchors handle heavy art safely.
Find wall studs for the most secure hanging. A stud finder costs less than 20 dollars and prevents future disasters with fallen artwork.
Brick and concrete walls require masonry anchors and a hammer drill. These walls support tremendous weight but need proper tools for installation.
Avoiding Common Hanging Errors
Eyeballing height without measuring guarantees crooked, poorly placed artwork. Always use a measuring tape and level. No exceptions.
Hanging pictures too high ranks as the most frequent mistake. People tend to hang art where it looks good to them while standing close to the wall. Step back to check from normal viewing distance.
Using insufficient hardware causes fallen art and wall damage. Match your anchors and hooks to your artwork's actual weight, not guesses.
Styling Tips for Maximum Visual Impact
Height matters, but it's just one factor in creating beautiful wall displays. Consider lighting, color coordination, and room balance for professional results.
Lighting Your Wall Art
Natural light changes throughout the day. Hang art on walls that get indirect sunlight to prevent fading while maintaining visibility.
Picture lights mounted above frames add drama and focus. Install these 5 to 7 inches above the frame's top edge, angled down toward the center of the artwork.

Track lighting or ceiling spots should aim at the center point of your art. This highlights the piece without creating harsh glare or shadows.
Coordinating Art with Room Colors
Your artwork should complement existing room colors without matching exactly. Look for pieces that pull 1 or 2 accent colors from your furniture or decor.
Botanical wall art prints bring natural tones that work with nearly any color scheme. Green and earth tones create calming, versatile focal points.
Bold contrast makes statements. A bright piece on a neutral wall commands attention. Subtle tonal variations create sophisticated, cohesive spaces.
Creating Visual Weight and Balance
Large furniture needs substantial art to create balance. A tiny picture above a king-size bed looks lost. Choose pieces with visual weight that match furniture scale.
Odd numbers of pieces work better than even numbers in groupings. Three pieces create more interesting visual triangles than two or four items.
Distribute visual weight across the room. Don't cluster all art on one wall while leaving others bare. Spread pieces to create flow throughout your space.
Ready-to-Hang Museum Quality Canvas Prints
Skip the framing hassle. Our gallery-wrapped canvas prints come ready to hang straight from the box. Museum-quality materials ensure your art looks stunning at any height. Free worldwide shipping on every order.
Choosing Art That Works at Standard Heights
Some art styles naturally work better with standard hanging heights. Understanding these relationships helps you select pieces that look effortless once installed.
Line Art and Minimalist Pieces
Simple line drawings and minimal designs need precise placement to shine. These pieces rely on negative space, making exact height crucial for impact.
Line art canvas prints work beautifully in modern spaces where clean aesthetics matter. Their simplicity makes slight height variations more noticeable, so measure carefully.

Bold Pop Art and Statement Pieces
Large, colorful pieces forgive small height variations because they command attention regardless. Pop art and bold graphics create such strong focal points that exact measurements matter less.
That said, even statement pieces look better at proper height. The eye level rule enhances impact rather than diminishing these bold designs.
Explore pop art canvas prints when you want artwork that makes immediate impact. These pieces work especially well in entertainment spaces and modern living rooms.
Photography and Realistic Art
Photographic prints and realistic artwork demand accurate height placement. Our brains expect realistic images to sit at natural sight lines, making proper height essential.
Landscapes look best slightly lower than portraits. Horizons in landscape art should align roughly with your natural horizon view, typically 54 to 57 inches from the floor.
Special Considerations for Renters and Temporary Spaces
Renters face unique challenges hanging art without damaging walls. Several solutions let you achieve perfect height while protecting your security deposit.
Damage-Free Hanging Solutions
Picture hanging strips hold surprising weight without nails or screws. These adhesive strips support up to 16 pounds depending on the product and work on most wall surfaces.
Command strips by 3M offer removable options that peel off cleanly. Follow package directions exactly, especially the wall preparation and pressing steps, for best results.
Tension rods work between walls or in corners for lightweight fabric art or prints. These create temporary gallery spaces without any wall damage.
Making Small Holes Less Visible
Small nail holes are usually acceptable to landlords and easy to patch. Use thin finishing nails rather than large screws whenever possible.
Keep a small tube of spackle and touch-up paint. Fill holes before moving out by pressing spackle into the hole, smoothing flat, letting it dry, and touching up with matching paint.
Group your art to minimize holes. A gallery wall uses fewer total anchor points than spreading individual pieces across multiple walls.
Trending Picture Placement Styles for Modern Homes
Design trends influence how people hang pictures today. Understanding current styles helps create spaces that feel contemporary and intentional.
The Salon Wall Style
Salon style means filling an entire wall with art of various sizes, frame styles, and subjects. This eclectic approach originated in 18th century Paris and has returned to popularity.
Salon walls still follow the center point rule. The entire collection's visual center should hit eye level height, even though individual pieces spread across the entire wall space.

Start with your largest or most important piece at center height. Build outward in all directions, maintaining 2 to 3-inch spacing between frames.
Oversized Single Statement Pieces
One large piece makes dramatic impact while simplifying installation. These statement pieces typically start at 40 by 60 inches or larger.
Oversized art often breaks traditional rules successfully. These pieces can hang slightly lower than standard, with the bottom frame at 48 to 52 inches from the floor in rooms with proper ceiling height.
The visual weight of large pieces anchors rooms powerfully. Consider cityscape canvas prints in wide horizontal formats for maximum modern impact.
Layered Art and Leaning Pieces
Leaning art against walls has become hugely popular, especially on mantels, shelves, and console tables. This casual approach offers flexibility without commitment.
Layered art on picture ledges lets you swap pieces seasonally. Mount shelves at 54 to 60 inches for optimal viewing height of leaning artwork.
Mix leaning and hanging pieces for dimension. Hang smaller pieces on the wall above a console table, then lean a larger piece on the console surface below.
Picture Hanging Heights for Children's Rooms and Play Spaces
Children's rooms need different approaches since kids are shorter than adults. Art hung at standard adult height feels disconnected in spaces designed for children.
Adjusting Height for Growing Children
Hang art lower in young children's rooms. Position the center point at 48 to 52 inches from the floor so kids can actually see and appreciate their wall decor.
Plan for growth by using removable hanging methods. As children get taller, you can gradually raise artwork without creating multiple patched holes.

Kids room canvas prints should be anchored securely even at lower heights. Children interact more physically with their environment, so ensure artwork won't fall if bumped.
Creating Learning Walls
Educational art in children's spaces works best at seated height since kids spend considerable time on the floor. Consider hanging alphabet or number art even lower, around 36 to 40 inches.
Interactive pieces like chalkboard art or magnetic boards should mount with the bottom edge at child's reach height. Measure from the floor to your child's shoulder height for best access.
Optimizing Picture Height for Home Office Productivity
Office spaces have unique sight lines since you spend time seated at desks. Art placement should work for both standing and seated views.
Position art so you can see it comfortably while seated at your desk. This usually means slightly lower than standard height, around 52 to 55 inches to center.

Choose office canvas art that inspires without distracting. Abstract pieces or subtle nature scenes provide visual interest without pulling focus from work tasks.
Art behind your desk appears in video calls. Ensure pieces are centered in your camera frame, typically 50 to 60 inches from the floor depending on camera height.
Avoid glossy finishes in office spaces where screen glare reflects. Matte canvas prints eliminate distracting reflections while maintaining professional appearance.
Final Professional Tips for Picture Hanging Success
Years of interior design experience reveal patterns that separate amateur from professional picture placement. These final tips ensure your walls look expertly curated.
The Step-Back Test
After hanging any piece, step back 10 to 15 feet. This distance reveals how art truly looks in the space rather than how it appears up close.
Take a photo from normal viewing distance. Photos reveal imbalances and height issues your eye might miss when standing in the room.
Respecting Negative Space
Empty wall space matters as much as filled space. Don't feel pressured to cover every inch of your walls with artwork.
Large blank areas around well-placed pieces create breathing room that enhances rather than diminishes visual impact. Negative space is a design element, not a problem to solve.
Grouping Art Purposefully
Related pieces work better together than random assortments. Group art by color palette, subject matter, or style for cohesive displays.
Maintain consistent spacing between pieces in a grouping. The 2 to 3-inch rule for gallery walls applies to any multi-piece arrangement.
Consider theme-based collections like animal canvas prints for children's rooms or cars canvas prints for automotive enthusiasts when creating purposeful groupings.
Trusting the Process
Perfect picture placement takes practice. Your first attempts might need adjustment, and that's completely normal.
Start with less prominent walls to build confidence. Save your primary focal wall for after you've gained experience with the measurement and hanging process.
Visit our design blog for ongoing tips about art placement, interior styling, and creating gallery-worthy spaces at home.
Creating Your Perfectly Hung Picture Gallery
Hanging pictures at the right height transforms ordinary walls into intentional, professional-looking displays. The 57 to 60-inch eye level rule provides your foundation, while furniture coordination and room-specific adjustments refine the final result.
Remember that these guidelines exist to help, not restrict. Trust your eye once you understand the principles. Some spaces and situations call for breaking rules to achieve the best visual outcome.
Start with one room and perfect your technique. Measure carefully, use proper hardware, and don't rush the process. Well-hung art makes every day more beautiful.
Your walls deserve artwork that enhances your space. Whether you prefer bold abstracts, calming botanicals, or striking portraits, proper placement ensures each piece reaches its full potential.
Ready to find the perfect art for your newly measured walls? Explore museum-quality canvas prints in every style and size, all ready to hang at precisely the right height in your home.
Frequently Asked Questions About Picture Hanging Height
How high should you hang pictures on a wall in most rooms?
The standard rule places the center of your artwork at 57 to 60 inches from the floor, which represents average eye level for most people. This measurement comes from professional galleries and museums worldwide. Measure from the floor to 57 inches and mark this point lightly with a pencil as your center reference. This guideline works for most rooms and most people, though you may need small adjustments based on your specific ceiling height, furniture placement, or personal preference. The goal is making art feel naturally positioned where your eye naturally lands when you enter a room.
How high should pictures hang above a couch or sofa?
Leave 6 to 12 inches of space between the top of your sofa and the bottom frame of your artwork. This creates visual connection between furniture and art without making pieces feel cramped or disconnected. Measure from the back of your sofa upward 8 inches as a good starting point. The bottom frame should hover close enough to relate to the furniture below. If artwork sits too high, it creates an awkward gap that breaks your room's visual flow. Too low makes the art feel squished and uncomfortable. This spacing rule also applies to console tables, beds, and other substantial furniture pieces.
Should picture hanging height change for gallery walls?
Gallery walls should center as a whole around the standard 57 to 60-inch eye level mark. Think of your entire gallery arrangement as one large piece of art rather than individual items. Find the center point of the complete grouping and position that center at eye level height. Individual pieces within the gallery will extend both above and below this central point. Space individual frames 2 to 3 inches apart for cohesive appearance. Start by placing your largest or most important piece at center height, then build outward in all directions while maintaining consistent spacing between frames.
How do high ceilings affect picture hanging height?
Rooms with ceilings over 9 feet tall can accommodate artwork hung 3 to 6 inches higher than standard recommendations. Add these extra inches to the baseline 57-inch measurement to prevent art from feeling too low in expansive wall space. The best way to judge high ceiling placement involves stepping back 10 feet to view the entire wall. If artwork disappears into the wall, raise it slightly. If it dominates your sightline uncomfortably, bring it down a few inches. The proportions of your room and the size of your artwork also influence optimal height in tall spaces.
Does picture hanging height differ between rooms?
Different rooms need slight height adjustments based on how people use and view each space. Living rooms work perfectly with standard 57 to 60-inch height since people view art while seated. Bedrooms use the same measurement for standing views, with special consideration for art above beds following the 6 to 8-inch furniture spacing rule. Entryways and hallways get viewed while walking, making standard eye level ideal. Bathrooms often benefit from slightly lower placement, around 48 to 54 inches, due to mirrors and vanities. Home offices should consider seated sight lines, positioning art at 52 to 55 inches for comfortable viewing from a desk.
What's the best way to measure and mark picture hanging spots?
Start by measuring your artwork's height and dividing that number in half. Add the result to 57 inches to determine where the top of your frame should sit. For example, a 24-inch tall piece divided by 2 equals 12 inches; add 12 to 57 and your measurement becomes 69 inches from floor to the top of the frame. Remember to account for your hanging hardware by measuring from the frame's top to where the wire or hook sits when pulled taut, then subtract this from your marked height. Always use a measuring tape and level rather than eyeballing, and mark lightly with pencil for adjustments.
How should you hang multiple pictures on the same wall?
When hanging multiple pieces on one wall, maintain 2 to 3-inch spacing between frames for cohesive appearance. The entire grouping should center around the 57 to 60-inch eye level mark, treating all pieces as one unified display. For horizontal rows of same-sized pieces, align the center points at the same height. For varied arrangements, find the center point of your complete layout before hanging any individual piece. Use odd numbers of pieces when possible, as three or five items create more interesting visual balance than even numbers. Plan your layout on the floor first and photograph it from above to see how pieces relate before putting any holes in your wall.

Leave a comment
This site is protected by hCaptcha and the hCaptcha Privacy Policy and Terms of Service apply.