Creating a beautiful home doesn't require a designer budget or a massive floor plan. Small house living offers unique opportunities to craft intentional, cozy spaces that feel twice their size. The secret isn't spending more. It's spending smarter.
This guide reveals the exact priority system design professionals use to transform compact homes on tight budgets. You'll discover which upgrades deliver the biggest visual impact first, where to save without sacrifice, and how to make every dollar count. Whether you're renting your first apartment or refreshing a starter home, these strategies work in real spaces with real budget constraints.
For more budget-friendly wall decor guides, explore practical tips that help small homes feel larger, lighter, and more intentional. Let's start with the quick wins.

Quick Takeaways
- Layout changes cost nothing but transform how space feels—clear walking paths and floating furniture create breathing room instantly
- Lighting upgrades under $200 make the biggest visual difference—layer ambient, task, and accent lighting to add depth and eliminate flat darkness
- One large statement piece of wall art beats ten small frames—proper scale makes rooms feel intentional, not cluttered
- Hang curtains at ceiling height, not window height—this simple trick visually stretches walls and makes ceilings appear taller
- Follow the priority ladder: layout first, then lighting, textiles, paint, and finally art—this sequence maximizes impact while minimizing waste
- Budget upgrades work when they fix specific problems—identify your space's biggest weakness (dark corners, bare walls, awkward furniture placement) and solve that first
- Small homes need fewer, better pieces—resist clutter by choosing two sculptural accents over twenty tiny trinkets

The Budget Rule That Changes Everything
Most people waste money decorating small homes because they buy randomly. A candle here. A throw pillow there. Three picture frames next week. None of it adds up to a cohesive look. The result feels scattered and unfinished despite spending hundreds of dollars.
Professional designers follow a different system. They spend where eyes land first and save on everything else. This creates focal points that anchor each room while supporting elements fade into the background. Your budget stretches further because money goes toward pieces that genuinely change how the space feels.

Spend Where Eyes Land First
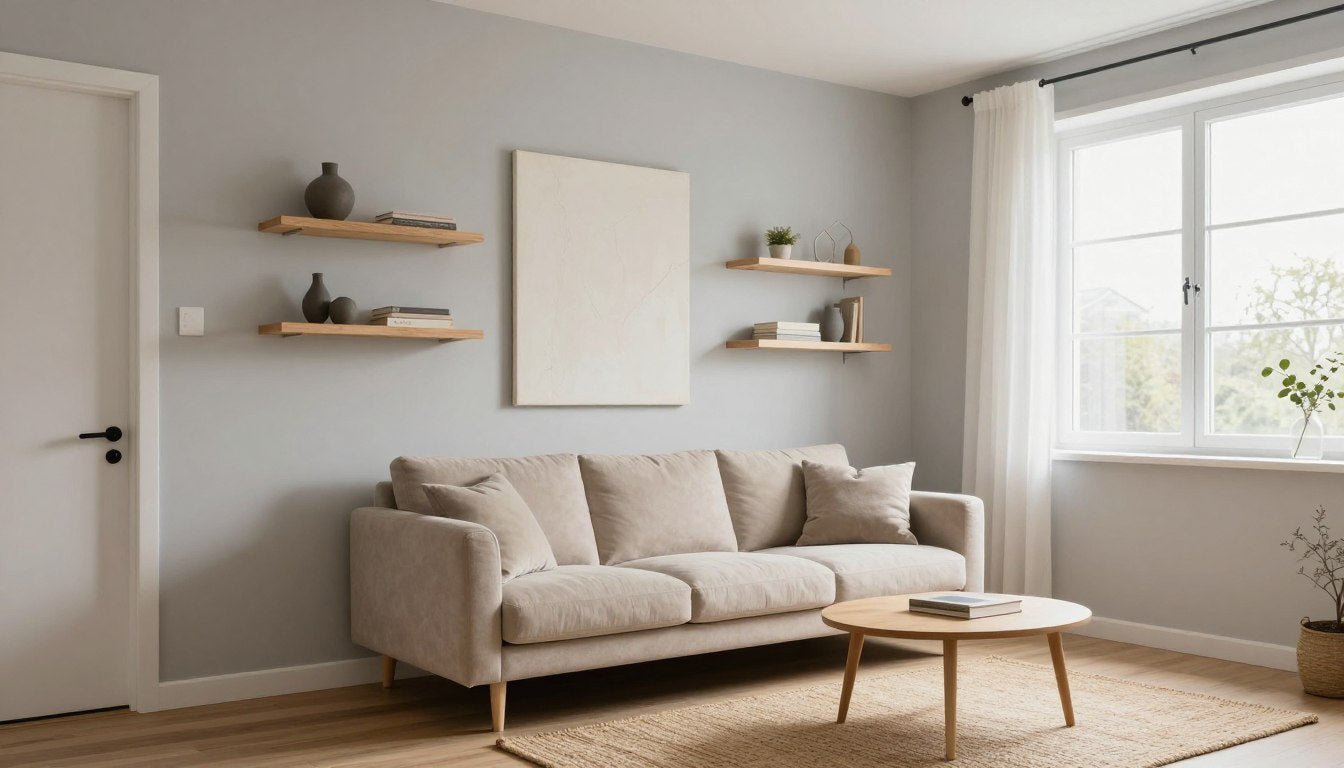
When you walk into a room, your eyes naturally travel to specific spots. The wall facing the door. The area above the sofa. The space surrounding the bed. These zones matter most because they set the tone for the entire room. Investing in these moments creates instant impact.
A single piece of bold wall art becomes the room's anchor. Proper lighting highlights that focal point while eliminating dark corners. A correctly sized area rug grounds furniture and defines the space. These three elements—art, lighting, rug—transform rooms faster than any other upgrades. They work together to create visual hierarchy that makes small spaces feel designed rather than decorated.
The mistake many homeowners make is spreading their budget across too many small items. Five $20 purchases feel safer than one $100 investment. But five small pieces create visual noise. One statement piece creates presence. In small homes where every inch matters, presence wins.

Save on "Supporting Cast" Items
Once your focal points exist, everything else should support them quietly. Side tables can come from budget stores. Small decorative items work perfectly from thrift shops. Throw pillows don't need designer labels when the sofa sits in front of stunning wall art. These supporting pieces serve functional roles without demanding attention.
This approach feels counterintuitive at first. Shouldn't everything match? Not necessarily. When one element commands the room's attention, mismatched supporting pieces actually add character. The key is keeping them simple and neutral so they don't compete with your investment pieces.
Think of your room as a stage. The lead actor (your statement art or sculptural piece) needs the spotlight. Supporting actors (side tables, small decor, accessories) play important roles but shouldn't steal the scene. This hierarchy creates rooms that feel cohesive without requiring expensive matching furniture sets.
Step 1: Layout (Free)
The most powerful design tool costs absolutely nothing. Rearranging furniture fixes awkward spaces, creates flow, and makes rooms feel larger. Before buying anything, optimize your layout. This foundation determines whether future purchases enhance or fight against your space.
Small house layouts fail when furniture blocks natural walking paths or when every piece hugs the walls. These arrangements waste floor space and create tunnel-like rooms that feel even smaller. The solution involves understanding how people actually move through your home and designing around those patterns.

Clear Walking Paths Plus Float Furniture When Possible
Every room needs obvious circulation routes. Walk from your entry to your kitchen. From your bedroom to your bathroom. From your sofa to your TV. These paths should feel natural and unobstructed. Furniture that interrupts these routes makes spaces feel cramped even when square footage allows room to breathe.
Floating furniture away from walls seems counterintuitive in small homes. Won't that make rooms feel smaller? Actually, the opposite happens. When a sofa sits 8 to 12 inches from the wall, the space behind creates visual depth. Your eye reads the room as larger because it can see layers rather than flat walls with furniture pressed against them.
This technique works especially well in living rooms. Float your sofa away from the back wall. Position it to face your focal point—whether that's a fireplace, window, or entertainment center. Place a narrow console table behind the sofa if the gap feels awkward. This setup creates zones within your room while maintaining open floor space for movement.
Bedrooms benefit from similar thinking. When possible, float your bed away from the wall with space for bedside tables on both sides. This arrangement feels more intentional and hotel-like. If your room is too small for floating, at least ensure 24 to 30 inches of walking space on the bed's primary access side.

One Focal Wall Per Room
Small spaces feel chaotic when every wall competes for attention. Choose one wall as your focal point and keep other walls quiet. This decision simplifies decorating choices and creates visual rest areas that make rooms feel less busy. Your focal wall becomes the room's identity while other surfaces provide breathing room.
In living rooms, the focal wall typically faces the main seating area. This might be the wall behind your TV, above your sofa, or surrounding a fireplace. In bedrooms, the wall behind your bed naturally draws attention. Kitchens often feature the wall opposite the sink as the focal point where you can see it while working.
Once you identify your focal wall, treat it differently. This is where your statement art lives. Where you might add texture with wood panels or interesting paint. Where lighting creates drama with sconces or picture lights. Other walls remain simple—perhaps a single floating shelf or one small piece of art at most.
This restraint feels difficult at first. We want to fill every empty space. But in small homes, empty wall space makes rooms feel larger. Those blank areas give your eyes places to rest. They make your focal wall stand out by contrast. The result is intentional design that feels calm rather than cluttered.
Step 2: Lighting (Under $100-$200)
Lighting changes everything. Dark rooms feel smaller, sadder, and cheaper regardless of how much you spend on furniture. Bright, layered lighting makes the same space feel twice as large and infinitely more expensive. This upgrade delivers enormous visual impact for relatively little money, especially if you focus on plug-in solutions that renters can install.
Most small homes rely on one overhead fixture per room. That single source creates harsh shadows and flat lighting that shows every flaw. The solution involves multiple light sources at different heights creating depth and eliminating dark corners. This approach costs far less than new furniture while transforming how your home feels every single day.

The Three-Layer Lighting Recipe
Professional lighting design follows a simple formula: ambient, task, and accent. Ambient lighting provides overall illumination—this is your overhead fixture. Task lighting focuses on specific activities like reading or cooking. Accent lighting highlights architectural features or art. Small homes need all three layers working together.
Start with your existing ambient light. If you rent and can't change the ceiling fixture, consider the brightness and color temperature. Warm LED bulbs (2700K to 3000K) create cozier spaces than cool daylight bulbs. Higher lumens mean more light—aim for 1,500 to 3,000 lumens total in living spaces, less in bedrooms.
Add task lighting where you work and relax. A floor lamp beside your reading chair. Under-cabinet strip lights in your kitchen. A desk lamp in your home office area. These targeted sources eliminate eye strain while creating visual interest. Look for adjustable options that direct light exactly where you need it without wasting brightness on ceilings.
Accent lighting makes the biggest design impact. Two matching sconces flanking wall art create gallery-style drama. A picture light above a painting adds sophistication. LED strip lights behind floating shelves create ambient glow. These touches cost $25 to $75 per fixture but elevate rooms dramatically. They signal intentional design rather than basic function.

Plug-In Sconces and Floor Lamps for Instant Depth
Renters and homeowners avoiding electrical work can create professional lighting with plug-in solutions. Wall sconces with visible cords look intentional when you paint the cord the same color as your wall or use cord covers. These fixtures cost $30 to $80 each and install in minutes with removable adhesive hooks or small finishing nails.
Position plug-in sconces 60 to 66 inches from the floor, centered on either side of wall art. This height works for most canvas sizes while keeping the fixture in proportion to the artwork. The sconces should sit 6 to 12 inches away from the art's edge depending on the piece's width. Measure carefully before installing to ensure symmetry.
Floor lamps deserve more credit in small house design. Modern arc lamps reach over sofas providing reading light without requiring side tables. Tripod floor lamps fit into corners adding height and light. Tower lamps with built-in shelves combine storage and illumination. Look for lamps between 58 to 68 inches tall that direct light both up and down for maximum effect.
Place floor lamps strategically to eliminate dark corners. One behind a chair creates a reading nook. One beside the sofa adds task lighting for evening relaxation. One in the bedroom corner removes shadows while providing soft ambient light at night. These additions cost $40 to $120 each but change how rooms feel more than any throw pillow ever could.
Step 3: Textiles (Biggest Cozy Upgrade)
Fabric transforms cold spaces into warm homes. Rugs, curtains, pillows, and throws add texture, color, and comfort without requiring tools or permanent installation. These pieces work especially well for renters because they're completely reversible. When you move, everything comes with you. Despite their temporary nature, textiles create some of the most dramatic before-and-after transformations in budget decorating.
The mistake most people make with textiles is buying too small or choosing too many competing patterns. A tiny rug floating in the middle of a room looks worse than no rug at all. Five different pillow patterns create visual chaos rather than style. Understanding a few basic rules helps textiles enhance rather than overwhelm small spaces.

Rug Sizing Basics
Rugs anchor furniture and define areas within open floor plans. In living rooms, your rug should fit under all furniture or at minimum under the front legs of your sofa and chairs. This grounds the seating area and makes it feel intentional. Rugs that sit entirely in front of furniture look like bathroom mats—they shrink the room rather than expanding it.
Measure your space before shopping. Living rooms typically need 8x10 or 9x12 rugs depending on furniture placement. Bedrooms work well with 8x10 rugs that extend 18 to 24 inches beyond the bed on three sides. Dining areas require rugs large enough that chairs remain on the rug even when pulled out—add 24 to 30 inches to your table dimensions in all directions.
Smaller spaces benefit from larger rugs more than you'd expect. A properly sized rug unifies the room and makes floor space feel continuous. Tiny rugs break up the floor into segments that make rooms feel choppy and smaller. If budget forces a choice between a cheap large rug and an expensive small rug, choose large every time. Natural fiber rugs like jute provide affordable size at $150 to $300 for 8x10 dimensions.
Avoid rugs with busy patterns in small homes unless your furniture and walls stay extremely simple. Solid colors or subtle textures work better because they don't compete with other design elements. Light colors make rooms feel larger. Darker colors hide stains better but can make spaces feel heavier. Medium tones balance both concerns while adding warmth to floors.

Curtains Hung High Equal Taller Ceilings
Hanging curtains at ceiling height rather than just above the window frame makes walls look taller and rooms feel more spacious. This trick costs nothing extra but changes the room's proportions dramatically. Your eyes follow the vertical lines upward, making low ceilings appear higher than they actually measure. It's an optical illusion that works every single time.
Mount curtain rods as close to the ceiling as possible—typically 4 to 6 inches below the ceiling line. Let the curtains drop all the way to the floor or hover about half an inch above it. This full-length treatment elongates walls even in rooms with standard 8-foot ceilings. The effect feels formal and intentional rather than builder-basic.
Choose curtains that are at least 1.5 to 2 times the width of your window. This fullness allows curtains to create gentle folds when closed rather than hanging flat like shower curtains. For maximum light control and insulation, layer sheer panels behind solid curtains. The sheers provide daytime privacy while the solid panels add evening darkness and temperature control.
Light-colored curtains in white, cream, or soft gray make rooms feel larger and brighter. They reflect natural light rather than absorbing it. Dark curtains work in bedrooms where you need complete darkness for sleep, but they make small spaces feel heavier during the day. If you love dark fabric, consider hanging it only in rooms where you want a moody, cozy atmosphere like bedrooms or media spaces.

Pillow and Throw Palette Formula
Throw pillows and blankets add color and comfort without permanent commitment. The formula for cohesive styling is simple: two neutral tones plus one accent color. This ratio creates visual interest without chaos. Your neutrals might be white and beige. Gray and cream. Tan and ivory. The accent color can be navy, rust, sage green, or any shade you love.
On a standard sofa, use 3 to 5 pillows total. Two larger pillows (20x20 or 22x22 inches) in your primary neutral color anchor the corners. Two smaller pillows (18x18 inches) in your secondary neutral sit in front. One accent pillow in the center or to one side brings personality. This arrangement feels balanced and intentional without overdoing it.
Mix textures instead of patterns when working with limited space. A linen pillow next to a chunky knit pillow next to a velvet pillow creates interest through touch rather than visual competition. If you want one patterned pillow, make it subtle—thin stripes, small geometric shapes, or tone-on-tone designs work better than large florals or busy graphics in compact rooms.
Throws should coordinate with your pillow palette. Drape one throw over the sofa arm or fold one at the foot of your bed. The throw adds warmth and makes the space feel livable rather than staged. Choose oversized throws (60x70 inches minimum) that provide actual warmth rather than decorative scraps of fabric. Functionality matters in small homes where every piece should serve multiple purposes.
Step 4: Paint and Color Tricks (Low-Cost Renovation)
Paint delivers the biggest transformation for the smallest investment. A gallon of quality paint costs $30 to $60 and covers approximately 350 square feet. For under $200, you can repaint an entire small home and completely change how it feels. This makes paint the ultimate budget upgrade when you want dramatic impact without furniture replacement.
Color choices matter more in small spaces than large ones. The wrong shade makes rooms feel cramped, dark, or cold. The right shade creates airiness, warmth, and cohesion. Understanding which colors expand spaces and which shrink them helps you make smart choices that enhance rather than fight against your square footage.

Best Budget Palettes for Small Homes
Light neutral colors make small homes feel larger by reflecting natural and artificial light. The most versatile shades sit in the warm white to greige family—colors with names like Swiss Coffee, Alabaster, Accessible Beige, or Repose Gray. These tones create cohesion when used throughout open floor plans while providing enough warmth that spaces don't feel sterile.
Avoid stark white in small homes unless you have abundant natural light. Pure white shows every flaw and can feel cold or clinical. Off-whites with subtle beige, gray, or greige undertones provide the light-reflecting benefits of white while adding warmth. Test paint samples on your walls and observe them at different times of day before committing. Colors shift dramatically between morning light and evening artificial light.
Monochromatic schemes work beautifully in compact spaces. Choose three shades from the same color family—light walls, medium furniture or textiles, and darker accents in pillows or art. This creates visual flow without abrupt contrasts that break up the space. Popular combinations include warm whites with tans and dark chocolate, cool grays with soft blues and navy, or creamy whites with sage and forest green.
If you love color, use it strategically. One accent wall in a deeper shade adds personality without overwhelming the room. Choose the wall you want to emphasize—typically the focal wall behind your bed or sofa. Paint the other three walls in a lighter neutral that coordinates. This technique creates depth while keeping the room feeling open and bright.

One Accent Wall Versus Full Repaint
Accent walls cost less and require less work than repainting entire rooms. If your existing wall color is neutral and in good condition, consider adding just one statement wall instead of doing all four. This approach saves time and money while still refreshing the space. It works especially well when you're unsure about color commitment or when you want to test a bolder shade.
The best accent walls have architectural reasons to stand out. The wall behind your headboard. The wall featuring your fireplace or TV. The wall opposite your main entry that draws attention when you walk in. These locations naturally command focus, so adding color reinforces what your eye already wants to see. Random accent walls without purpose just confuse the visual flow.
When budget allows full repaints, consider different shades in different rooms rather than one color throughout. Bedrooms can be slightly darker or more saturated than living spaces since you want them to feel cozy and restful. Bathrooms can handle bolder colors because they're small and you're not in them constantly. Living areas benefit from lighter, more neutral tones that appeal to everyone and provide a backdrop for changing decor styles.
Don't forget about ceilings and trim. Painting ceilings bright white makes them recede, creating the illusion of higher walls. Painting trim in a brighter white than your wall color adds definition and makes rooms feel more finished. These small details cost minimal extra money but significantly impact the final result. They're the difference between DIY paint jobs that look amateur and those that appear professional.
Step 5: Wall Art as the Luxury Signal
Wall art tells visitors more about your home than any other design element. Empty walls signal temporary living or lack of investment. Poorly chosen art makes spaces feel cluttered or cheap. The right pieces transform budget spaces into curated homes that feel intentional and personal. This is where small investments create disproportionate impact on how expensive your home appears.
The art you choose matters less than how you choose it. One large statement piece beats a scattered collection of small frames. Proper placement at the correct height looks professional. Cohesive framing creates gallery-quality presentation. Understanding these principles helps budget art look expensive while expensive art installed poorly still looks amateur.

Elevate Your Space with Budget-Friendly Canvas Prints
Transform your small home with gallery-quality canvas art starting at $89. Our curated collection offers modern designs scaled perfectly for compact spaces, creating focal points that make rooms feel intentional and sophisticated.
One Statement Canvas Over Many Tiny Prints
Small spaces need fewer, larger pieces of art. A single 40x60 inch canvas above your sofa creates instant impact and anchors the entire room. Ten small 8x10 frames scattered across the same wall create visual clutter that makes the space feel busy and small. Scale matters more than quantity when decorating compact homes.
Choose art that fills approximately two-thirds to three-quarters of your furniture's width. If your sofa measures 72 inches wide, your art should span roughly 48 to 54 inches. This proportion looks balanced and intentional. Art that's too small creates an awkward gap on either side. Art that's too large overwhelms the furniture below. Getting the scale right makes even affordable art look professionally chosen.
Abstract art and botanical prints work particularly well in small spaces because they don't demand specific style commitment. A modern abstract in neutrals with one accent color coordinates with changing decor over years. Large-scale leaf prints add life without requiring actual plant maintenance. These subjects feel current and timeless simultaneously, which matters when you're making long-term art investments.
For renters or commitment-phobes, canvas art prints offer flexibility that framed pieces don't. Canvas arrives ready to hang with built-in hanging hardware. No expensive framing required. If you move or want to change the look, canvas stores easily without glass that can break. This practical benefit makes canvas the ideal choice for budget-conscious decorators who value adaptability.

Height and Spacing Rules
Proper art placement follows simple mathematical rules that create professional results. Hang art so the center point sits at 57 to 60 inches from the floor—this is standard gallery height that aligns with average eye level. For art above furniture, leave 6 to 10 inches of space between the furniture top and the art's bottom edge. This connection visually links the pieces while providing breathing room.
When creating gallery walls with multiple pieces, plan the entire layout on the floor first. Arrange frames until you find a configuration you love, then measure and mark wall positions before hammering nails. Maintain consistent spacing between frames—typically 2 to 4 inches works well. Uneven spacing looks accidental rather than intentional, undermining even beautiful art choices.
For proper art print sizes and framing guidance, consider the room's purpose and viewing distance. Bedrooms where you see art from the bed need larger prints than hallways where you pass quickly. Living rooms with deep sofas can handle bigger art because viewing distance is greater. Small spaces actually benefit from oversized art that creates drama and draws focus.
Measure twice, hang once. Use a level to ensure straight hanging—crooked art looks sloppy regardless of its quality. For heavy pieces over 30 pounds, use proper wall anchors rated for the weight rather than relying on picture hooks alone. This extra five minutes of care prevents art from crashing down and damaging walls, especially important in rentals where you're responsible for repair costs.

Renter-Friendly Hanging Tips
Renters can hang art without losing security deposits by using damage-free methods. Command Picture Hanging Strips hold up to 16 pounds per set without nails or screws. They work perfectly for lightweight canvas and framed prints. Follow package instructions carefully—pressing strips firmly for 30 seconds ensures proper adhesion. Remove strips by pulling straight down slowly to avoid wall damage when moving.
For heavier art, small finishing nails leave minimal holes that touch-up paint easily conceals. Use thin nails (16-gauge or smaller) and angle them slightly upward for better hold. When you move, remove nails, fill holes with spackling compound, and touch up with matching paint. Most landlords consider small nail holes normal wear and won't charge for these minor repairs if properly filled.
The best renter-friendly hanging techniques for canvas include using adhesive hooks rated for appropriate weight. Position hooks according to the canvas's built-in hanging hardware—wire or sawtooth hangers. For very lightweight canvas under 5 pounds, even removable adhesive strips work well. Always test the hold for 24 hours before considering the installation complete.
Create a hanging kit with essential tools so you're always prepared. Include a tape measure, pencil, level, hammer, picture hanging wire, various hooks and nails, and Command Strips in different weight ratings. Store everything in a small toolbox or bag. Having these items ready prevents frustration and helps you hang art immediately when inspiration strikes rather than waiting weeks to buy supplies.
Step 6: Sculptures and Objects (Minimal, Not Messy)
Three-dimensional objects add depth that flat art cannot. Sculptural pieces on shelves, consoles, and side tables create visual interest from multiple angles. But small homes require restraint. Too many objects create dust-collecting clutter. The right sculptural accents make rooms feel curated and sophisticated rather than stuffed with tchotchkes from every vacation.
The challenge is knowing where to stop. One beautiful vase looks intentional. Five random vases look like you couldn't decide. Strategic placement of carefully chosen sculptural elements creates impact while maintaining the clean, open feeling that makes small spaces livable. This requires editing skills and willingness to put pieces in storage rotation rather than displaying everything simultaneously.

Modern Sculptures for Small-Space Style
Follow the "two sculptural accents" rule with curated pieces designed for shelves and consoles in compact homes. These statement objects create focal points without cluttering limited surface area.
Two Sculptural Accents Rule
Limit each surface to two significant objects maximum. A console table holds one vase and one small sculpture. A bookshelf features one sculptural bookend and one interesting object per shelf. A coffee table displays one bowl and one decorative object. This restraint forces you to choose quality over quantity and creates negative space that makes each piece stand out.
Choose sculptural pieces with clean lines and interesting shapes rather than busy detail. Modern ceramics in matte finishes. Geometric metal sculptures. Natural wood bowls or vessels. Stone objects with organic forms. These pieces feel timeless and sophisticated. They work across style changes because their appeal comes from form rather than trend. Avoid anything with excessive decoration, bright colors, or cute themes unless your entire home commits to that aesthetic.
Vary height and material when placing multiple objects together. A tall thin sculpture next to a low wide bowl creates visual rhythm. Metal paired with ceramic provides textural contrast. Matte finishes alongside glossy surfaces add dimension. This variety within restraint looks intentional and collected rather than matched or random. It suggests you chose each piece deliberately over time rather than buying everything in one shopping trip.
Sculptural objects work especially well as bookend alternatives. Instead of actual bookends holding books on shelves, use weighted decorative objects that serve dual purpose. A stone sphere. A small bronze sculpture. A chunky ceramic piece. These functional sculptures organize books while adding three-dimensional interest to otherwise flat shelf displays. They justify their presence by working rather than just sitting.

Remember that plants count as sculptural elements. One substantial potted plant makes more impact than three small ones. Choose plants with interesting leaf shapes or structural forms—fiddle leaf figs, snake plants, or sculptural succulents. These living sculptures add life to small spaces while serving functional air-purifying roles. Place them where they receive adequate light and where their form enhances rather than blocks room flow.
Room-by-Room Budget Recipes
Theory becomes actionable when broken down by specific rooms. Each space in your home has unique challenges and opportunities for budget upgrades. Understanding where to focus your limited funds in each room prevents wasted money on low-impact changes. These recipes provide starting frameworks you can adapt based on your specific needs and aesthetic preferences.
The budget ranges offered—under $150, under $300, under $500—represent realistic price points for meaningful transformations. Lower budgets focus on highest-impact changes like lighting and textiles. Higher budgets add more layers including furniture upgrades or multiple improvements simultaneously. Choose your budget tier based on urgency and available funds, knowing you can always implement additional changes later as budget allows.

Living Room Budget Tiers
Under $150: Start with lighting since it changes everything about how the room feels. Add one floor lamp with a three-way bulb providing adjustable brightness ($50-$80). Invest in throw pillows in your chosen color scheme—three to four pillows in varying textures ($30-$60 total). Find one piece of modern canvas wall art on sale or from budget retailers to anchor your focal wall ($40-$70). This combination creates a styled look that photographs well and feels intentional.
Under $300: Add an area rug sized appropriately for your furniture arrangement ($100-$150 for 8x10 natural fiber rug). Upgrade to two floor lamps or one floor lamp plus two plug-in wall sconces flanking your art ($80-$120 for lighting upgrades). Buy curtain panels in floor-length dimensions and install curtain rods at ceiling height ($40-$60 for two panels plus rod). These additions layer texture and light while making your room feel taller and more cohesive. The rug alone transforms the entire space by grounding furniture and defining your seating area.
Under $500: Build on the previous tier by adding a quality throw blanket in complementary color ($40-$60). Replace or add a table lamp for reading areas ($50-$80). Invest in larger statement art—a 40x60 inch canvas or a set of coordinating pieces ($120-$180). Consider painting an accent wall if your budget allows ($50-$80 for paint and supplies). You can also add floating shelves for books and sculptural objects ($40-$60 installed). At this level, every major surface has been addressed, creating a complete room that looks professionally designed despite the modest budget.

Bedroom Budget Tiers
Under $100: Focus on lighting and textiles for immediate coziness. Add two plug-in wall sconces with warm bulbs flanking your focal wall ($50-$70 for pair). Buy one set of quality throw pillows for your bed—two Euro shams plus two smaller accent pillows ($30-$50). Rearrange furniture to optimize layout if needed (free). This small investment makes bedrooms feel hotel-like by adding layered lighting and styled bedding that invites rest.
Under $250: Add all the Under $100 upgrades plus a statement piece of wall art above your bed ($80-$120 for 30x40 or 36x48 inch canvas). Include one medium-sized area rug that extends beyond the bed on three sides ($60-$100 for 5x8 or 6x9 natural fiber rug). Consider blackout curtains if light control is an issue ($40-$60). These changes create a complete bedroom that feels restful and intentional. The art anchors the space while the rug adds warmth and comfort when you step out of bed.
Entryway Budget Tiers
Under $75: Small entryways benefit from vertical storage and one focal point. Mount three to four hooks on the wall for coats and bags ($15-$25). Add a small shelf or narrow floating console if space allows ($30-$50 secondhand or IKEA). Place one piece of smaller-scale art above the console (under $40 on sale). A small basket underneath corrals shoes ($10-$20). This creates function and style in the smallest footprint, making entries feel organized rather than cluttered.

Kitchen Budget Refresh
Under $200 (No Renovation Required): Kitchens feel instantly upgraded with better lighting and organization. Install under-cabinet LED strip lights for task lighting ($30-$50 for supplies). Add open shelving using simple brackets and wood planks ($40-$60 for two shelves). Style shelves with matching glass storage jars and your best dishes displayed ($40-$60). Mount one piece of smaller kitchen-appropriate art on a visible wall ($30-$40). Replace cabinet hardware with modern pulls in consistent finish ($30-$50 depending on number of cabinets). These changes avoid renovation costs while dramatically improving your kitchen's appearance and functionality. The lighting alone makes cooking easier and the space more inviting.
Common Budget Mistakes and Fixes
Even with the best intentions, certain decorating mistakes repeatedly sabotage small house budgets. Recognizing these patterns helps you avoid wasted money on changes that don't improve your space. Most mistakes stem from buying impulsively rather than following a plan or purchasing items in wrong proportions for your room size.
The good news is that these mistakes are fixable without starting completely over. Sometimes the solution involves removing rather than adding. Other times it means exchanging one wrong-sized item for the correct one. Understanding what doesn't work helps you recognize it immediately rather than living with mediocre results for months before realizing the problem.
Too Many Small Items
Purchasing numerous small decorative objects feels safer than investing in one larger piece. But collections of tiny vases, frames, and trinkets create visual clutter that makes small spaces feel cramped. Each small item demands attention without providing enough presence to anchor the room.
The Fix: Edit ruthlessly. Keep only your favorite two or three small items per surface. Store the rest in rotation. Invest in one or two larger statement pieces with the money you would have spent on multiple small items. Display the big pieces prominently and let them do the heavy lifting in your design.
Mismatched Finishes
Hardware and lighting in multiple different finishes—brass, chrome, oil-rubbed bronze, copper—create disjointed spaces that feel unintentional. Each finish pulls your eye in different directions. The room lacks cohesion even if other elements coordinate well. This happens gradually as you add pieces over time without considering how they work together.
The Fix: Choose two finishes maximum for your entire home. Common combinations include matte black with brass, brushed nickel with wood, or chrome with copper. Replace mismatched items gradually as budget allows, prioritizing the most visible pieces first—cabinet pulls, light fixtures, curtain rods. Consistency in finishes ties everything together and makes even budget pieces look more expensive.
Tiny Art on Large Walls
The most common art mistake is hanging pieces too small for the space. An 8x10 frame above a full-sized sofa looks lost and unfinished. Multiple small frames scattered randomly across a wall create busy visual noise. Small art makes rooms feel smaller by emphasizing how much empty space surrounds it. This problem often results from inheriting small pieces or buying what fits in your car rather than what fits your wall.
The Fix: Create a gallery wall grouping with your small pieces to increase overall visual weight. Arrange 4-6 small frames tightly together, treating the entire group as one large unit. Alternatively, replace small art with appropriately scaled pieces—invest in one 30x40 inch canvas rather than three 11x14 inch frames. The single larger piece creates instant impact that transforms the entire room. You can repurpose the small art in hallways, bedrooms, or bathrooms where smaller scale works better.
Wrong Curtain Height
Hanging curtains just above the window frame wastes one of the easiest ceiling-height tricks. Short curtains make walls look lower and rooms feel smaller. This mistake happens because people assume curtains should frame windows specifically rather than the entire wall. The proportions feel off even if you can't immediately identify why.
The Fix: Remount curtain rods as close to the ceiling as possible—4 to 6 inches below the ceiling line. You may need longer panels than originally purchased to reach the floor from the new height. If budget doesn't allow new curtains immediately, prioritize the rooms you use most—living room or bedroom—and fix others later. The difference is dramatic enough that you'll wish you'd done it sooner.

Budget Impact Calculator: Where Your Money Works Hardest
Not all upgrades deliver equal visual impact. Understanding which changes give you the most dramatic results helps prioritize spending when budget is limited. This calculator shows realistic cost ranges, expected impact, and implementation time for major small-house upgrades. Use it to plan your projects strategically rather than buying randomly.
The "visual impact" ratings consider how much each upgrade changes your room's appearance and how noticeable the improvement is to visitors. High-impact changes transform spaces dramatically even if they're simple to implement. Low-impact changes improve comfort or function without significantly altering how rooms look. Both types have value depending on your priorities.
| Upgrade Category | Cost Range | Visual Impact | Best Room | Common Mistake | Time Investment |
| Layout Rearrangement | $0 | High | Living Room, Bedroom | Blocking natural walking paths, pushing all furniture against walls | 2-3 hours |
| Floor Lamp Addition | $40-$120 | High | Living Room, Bedroom | Buying lamps too short or in wrong style | 15 minutes |
| Plug-in Wall Sconces | $60-$160 (pair) | High | Bedroom, Living Room | Hanging at wrong height or too far from art | 30-45 minutes |
| Area Rug (8x10) | $100-$300 | High | Living Room | Buying rug too small for furniture arrangement | 15 minutes |
| Ceiling-Height Curtains | $40-$100 | High | Living Room, Bedroom | Hanging rod at window height instead of ceiling | 45 minutes |
| Statement Wall Art | $80-$200 | High | Living Room, Bedroom | Choosing art too small for the wall | 30 minutes |
| Accent Wall Paint | $50-$100 | Medium-High | Bedroom, Living Room | Choosing wrong wall or color too dark | 4-6 hours |
| Throw Pillows | $30-$80 | Medium | Living Room, Bedroom | Too many patterns, mismatched sizes | 10 minutes |
| Under-Cabinet Lighting | $30-$80 | Medium-High | Kitchen | Visible LED dots, wrong color temperature | 1-2 hours |
| Bedroom Area Rug | $60-$150 | Medium | Bedroom | Rug not extending beyond bed sides | 15 minutes |
| Floating Shelves | $40-$100 | Medium | Living Room, Kitchen | Overcrowding shelves with too many items | 1-2 hours |
| Cabinet Hardware | $30-$80 | Medium | Kitchen, Bathroom | Mixing multiple finish types | 1-2 hours |
| Sculptural Objects | $40-$120 | Medium | Living Room, Entry | Buying too many small objects instead of statement pieces | 15 minutes |
| Full Room Repaint | $100-$200 | High | Any | Choosing colors without testing samples first | Full weekend |

Small House Budget Checklist: Your Action Plan
Transform your small house systematically using this actionable checklist. Start at the top and work down, completing each category before moving to the next. This sequence ensures you build on previous improvements rather than jumping randomly between projects. Check off items as you complete them to track progress and maintain momentum.
This checklist synthesizes everything covered in this guide into one reference tool. Keep it accessible while shopping or planning projects. The order reflects impact priority—changes that deliver the most dramatic visual improvements for the least money come first. Later items add refinement and personality after foundational elements are solid.
Phase 1: Foundation (Cost: $0-$50)
- Rearrange furniture to create clear walking paths and float pieces away from walls where possible
- Identify one focal wall per room and remove competing elements from other walls
- Choose one consistent color direction plus one accent color for your entire home
- Declutter surfaces keeping only two sculptural objects per table or shelf
- Replace all light bulbs with warm LED bulbs (2700K-3000K) in consistent color temperature
Phase 2: High-Impact Basics (Cost: $150-$300)
- Add one floor lamp or pair of plug-in wall sconces in your main living space
- Hang curtains at ceiling height with panels that reach the floor
- Purchase correctly sized area rug that extends under furniture
- Install one statement piece of wall art scaled appropriately for your focal wall
- Choose and limit metal finishes to two types maximum throughout your home
Phase 3: Layering Comfort (Cost: $100-$200)
- Add throw pillows following two-neutral-plus-one-accent-color formula
- Include one oversized throw blanket in coordinating palette
- Paint one accent wall if desired or touch up existing paint
- Add task lighting where needed for reading or work areas
- Style shelves with books and exactly two decorative objects per shelf
Phase 4: Refinement (Cost: $100-$250)
- Add second or third pieces of wall art maintaining proper scale and spacing
- Include under-cabinet lighting in kitchen or bathroom
- Replace mismatched hardware with consistent finish choices
- Add one or two modern sculptural pieces for consoles or shelves
- Install floating shelves for additional display and storage
Phase 5: Personal Touches (Cost: Varies)
- Add plants in appropriately sized pots as living sculptural elements
- Create small gallery wall groupings with personal photos or small art
- Include textured elements like woven baskets or natural fiber accessories
- Add final accent pieces that reflect your personality and interests
- Consider one original painting as long-term investment piece

Helpful Resources for Budget Small House Design
Expand your design knowledge with these comprehensive guides that complement the strategies in this article. Each resource addresses specific aspects of budget-friendly decorating with detailed instructions, measurements, and visual examples. These guides help you avoid common mistakes while implementing the techniques discussed here.
Essential Reading Path
Master the technical details of wall art with our complete guide to art print sizes and framing. Learn exactly which dimensions work for different furniture sizes and room layouts. This removes guesswork when shopping online or in stores.
Renters especially benefit from our damage-free canvas hanging techniques. These methods avoid security deposit deductions while achieving professional results. Perfect for anyone wanting flexibility without commitment.
Understanding media types helps you make smarter purchases. Our guide explaining what canvas art prints are and how they differ from framed prints clarifies options and price points. You'll know exactly what you're buying and why it matters.
Before making any art investments, read our comprehensive canvas print buyer's guide. Learn where to find quality prints, how to evaluate options, and strategies for maximizing your budget. This guide has saved readers hundreds of dollars by helping them avoid common purchasing mistakes.

Frequently Asked Questions
How do I decorate a small house on a tight budget?
Start with free layout changes that optimize furniture placement and create clear walking paths. Then focus your budget on three high-impact upgrades: lighting (add floor lamps or plug-in sconces for $50-$100), one statement piece of wall art ($80-$150), and properly sized textiles like rugs and curtains ($100-$200). These create the biggest visual transformation for around $250-$450 total.
Avoid spreading money across many small decorative items. Instead, invest in fewer, larger pieces that anchor your rooms. Shop sales and secondhand stores for textiles and lighting. Save money on supporting elements like side tables and small decor while spending on focal points everyone notices first.
What should I buy first to make my home look more expensive?
Lighting creates the most dramatic impact per dollar spent. Add a quality floor lamp with three-way brightness control or install plug-in wall sconces flanking your focal wall. Good lighting eliminates dark corners and adds depth that makes spaces feel larger and more sophisticated. This upgrade costs $50-$120 and changes how your entire room appears.
The second priority is one large piece of statement wall art scaled appropriately for your space. A single 40x60 inch canvas looks more expensive than ten small frames and instantly elevates the room. Combine proper lighting with scaled art for a transformation that makes rooms feel professionally designed.
What are the best budget paint colors for a small house?
Light neutral colors in the warm white to greige family make small spaces feel largest. Look for colors like Swiss Coffee, Alabaster, Accessible Beige, Revere Pewter, or Repose Gray. These shades reflect light without feeling stark or cold. They work throughout open floor plans creating cohesion while providing enough warmth that rooms feel inviting.
Avoid pure white unless you have abundant natural light—it shows every flaw and can feel sterile. Also avoid very dark colors on all walls as they absorb light and make rooms feel smaller. Save darker shades for single accent walls behind beds or sofas where they add depth without overwhelming the space.
How can I make a small living room look bigger cheaply?
Hang curtains at ceiling height rather than window height—this vertical line draws eyes upward making ceilings appear taller. Use a large area rug that extends under all furniture rather than a small rug floating in the middle. Float your sofa 8-12 inches from the wall instead of pushing it against the wall—this creates depth layers your eye reads as more space.
Add multiple light sources at different heights to eliminate dark corners. Paint walls in light neutral colors that reflect light. Choose one focal wall with statement art and keep other walls minimal. Remove unnecessary furniture and clutter—empty space makes rooms feel larger. These strategies cost little but dramatically change spatial perception.
What size wall art should I choose for a small room?
Art should span approximately two-thirds to three-quarters of the furniture width below it. For a 72-inch sofa, choose art between 48-54 inches wide. Above a queen bed (60 inches), select art 40-45 inches wide. One large piece creates more impact than multiple small frames in compact spaces.
Common sizes for small house focal walls include 30x40 inches, 36x48 inches, or 40x60 inches. Smaller spaces can use 24x36 inches or 30x40 inches. Always measure your wall and furniture before buying. Art that's too small looks unfinished while properly scaled art makes rooms feel intentional and complete.
How do I create a gallery wall on a budget?
Start by arranging frames on the floor until you find a layout you love. Measure the entire arrangement's dimensions and mark the center point on your wall at 57-60 inches from the floor. Maintain 2-4 inches of consistent spacing between frames. Use matching frames in one finish (all black or all natural wood) to unify mismatched art and photos.
Shop thrift stores and discount retailers for frames. Print personal photos at drug stores or online services for $0.20-$0.50 per print. Mix personal photos with affordable art prints from online retailers. Keep the overall grouping compact rather than spreading tiny frames across an entire wall. Treat the gallery wall as one large unit rather than individual pieces.
What are renter-friendly decor upgrades that actually look good?
Plug-in wall sconces add sophisticated lighting without hardwiring. Command strips hold canvas art and lightweight frames without nail holes. Peel-and-stick wallpaper creates accent walls that remove cleanly. Tension rods hang curtains without drilling into walls. Freestanding furniture like ladder shelves and bar carts add storage without installation.
Small finishing nails leave tiny holes easily filled with spackle when moving. Paint the nail and cord the same color as your wall for seamless appearance. Choose furniture on wheels for flexibility. Invest in quality textiles like rugs, curtains, and pillows that move with you. These upgrades look permanent and polished while remaining completely reversible.
How can I style shelves in a small house without clutter?
Follow the two-objects-per-shelf rule. Choose one taller sculptural piece and one lower bowl or vessel. Leave negative space—shelves should be roughly 50-60 percent empty for visual breathing room. Arrange books in vertical stacks with one decorative object as a bookend rather than lining up books traditionally.
Vary heights and materials across shelves while maintaining color cohesion. Use matte ceramics, natural wood, and one metallic finish consistently throughout. Avoid tiny trinkets and souvenir collections—choose larger, more substantial pieces with clean lines. Edit seasonally, storing excess items in rotation boxes. This restraint makes shelves look curated rather than cluttered, which is essential in small spaces where every surface shows.

Final Thoughts on Low Budget Small House Interior Design
Budget constraints don't prevent beautiful homes. They simply require more intentional choices. The strategies in this guide prioritize impact over cost, helping you create spaces that feel designed rather than decorated. Start with layout and lighting—these free or low-cost changes transform how rooms feel immediately. Build from there with textiles, paint, and art that anchor your design vision.
Remember that small house design succeeds through restraint. Fewer, better pieces always win over numerous mediocre items. One statement canvas above your sofa creates more impact than a scattered gallery wall. Two carefully chosen sculptures outperform a shelf crammed with tchotchotkes. This editing discipline makes budget decorating look expensive because every piece justifies its presence.
The most successful small house interiors evolve over time rather than happening overnight. Implement changes in phases as budget allows. Follow the priority ladder outlined here—layout, lighting, textiles, paint, and art. Each layer builds on previous improvements, creating cohesive rooms that feel complete even on limited budgets. Patience and planning beat impulse purchases every time.
Whether you choose an affordable canvas print or invest in an original painting, art remains the single upgrade that makes budget spaces feel like curated homes. It signals intention, personality, and investment in your environment. Combined with smart lighting, proper scale, and thoughtful textile choices, even the smallest house on the tightest budget can achieve the pulled-together look you're seeking.


Leave a comment
This site is protected by hCaptcha and the hCaptcha Privacy Policy and Terms of Service apply.